Install OpenRTM-aist (Python Version) 1.2
Explains how to install OpenRTM-aist (Python Version).
Install on Windows
Install OpenRTM-aist
The procedure for installing OpenRTM-aist using the MSI installer is described on the following page.
Installation of software required for the development
RTC development requires to install CMake, Doxygen, and Visual Studio.
- CMake (3.11 or more recommended) During the installation, you will be asked what you want to set to the system PATH as [Install Options], it is recommended that you select Add the CMake path to the system PATH for all users. (Our test is done with it.)
- Doxygen
Install the download version through the above link, or obtain and install Visual Studio 2010/2012/2013/2015/2017/2019 separately. Visual Studio is not directly necessary for Python-based RTC development itself, but it is necessary if you want to create an MSI distribution package with the OpenRTM-aist environment for distributing the developed RTC.
What the installer does
The installer does the following:
- Copy various files under the installation directory (default is C: \ Program Files)
- Create OpenRTM-aist folder under the start menu and set various shortcuts
- Set environment variables
- Environmental variable setting when using 64-bit MSI
 RTM_BASE=C:\Program Files\OpenRTM-aist\
 RTM_ROOT=C:\Program Files\OpenRTM-aist\1.2.1\
 RTM_VC_VERSION=//Here, the text based on your choice of Visual C++/Studio version like "VC14" or so.
 RTM_JAVA_ROOT=C:\Program Files\OpenRTM-aist\1.2.1\
 OMNI_ROOT=C:\Program Files\OpenRTM-aist\1.2.1\omniORB\4.2.3_%RTM_VC_VERSION%\
 OpenCV_DIR=C:\Program Files\OpenRTM-aist\1.2.1\OpenCV3.4\
 OpenRTM_DIR=C:\Program Files\OpenRTM-aist\1.2.1\cmake\
- Additional setting to PATH when using 64-bit MSI
 C:\Program Files\OpenRTM-aist\1.2.1\bin\%RTM_VC_VERSION%\
 C:\Program Files\OpenRTM-aist\1.2.1\omniORB\4.2.1_%RTM_VC_VERSION%\bin\x86_win32\
 C:\Program Files\OpenRTM-aist\1.2.1\OpenCV3.4\%RTM_VC_VERSION%\bin\
- Environmental variable setting when using 32-bit MSI (For Windows 10 64-bit, "Program Files (x86)" is replaced with "Program Files" for 32-bit)
 RTM_BASE=C:\Program Files (x86)\OpenRTM-aist\
 RTM_ROOT=C:\Program Files (x86)\OpenRTM-aist\1.2.1\
 RTM_VC_VERSION= //Here, the text based on your choice of Visual C++/Studio version like "VC14" or so.
 RTM_JAVA_ROOT=C:\Program Files (x86)\OpenRTM-aist\1.2.1\
 OMNI_ROOT=C:\Program Files\OpenRTM-aist\1.2.1\omniORB\4.2.3_%RTM_VC_VERSION%\
 OpenCV_DIR=C:\Program Files\OpenRTM-aist\1.2.1\OpenCV3.4\
 OpenRTM_DIR=C:\Program Files\OpenRTM-aist\1.2.1\cmake\
- Additional seeting to PATH when using 32-bit MSI (For Windows 10 64-bit, "Program Files (x86)" is replaced with "Program Files" for 32-bit)
 C:\Program Files (x86)\OpenRTM-aist\1.2.1\bin\%RTM_VC_VERSION%\
 C:\Program Files(x86)\OpenRTM-aist\1.2.1\omniORB\4.2.3_%RTM_VC_VERSION%\bin\x86_win32\
 C:\Program Files(x86)\OpenRTM-aist\1.2.1\OpenCV3.4\x86\%RTM_VC_VERSION%\bin\
- Environmental variable setting when using 64-bit MSI
Files to be installed
The files are installed in the following structure:
 <install_dir>
   + OpenRTM-aist
      + 1.x.x: Runtime of old version
      + 1.2.1
         + bin: dll, lib various commands
         + cmake: OpenRTMConfig.cmake
         + coil: coil header file
         + Components
            + C ++
               + Examples: C ++ sample components
               + OpenCV: OpenCV C ++ sample component
            + Java: Java sample component
            + Python: Python sample component
         + etc: rtc.conf sample
         + jar: jar file
         + jre: OpenJDK JRE
         + omniORB
         + OpenCV3.4
         + rtm: OpenRTM-aist header file
            + ext: extension module file
            + idl: OpenRTM-aistIDL file
         + util
            + ExcelControlpy: Python based RTC for Microsoft Office
            + OpenRTP: RTCBuilder and RTSystemEditor tools
            + PowerPointControlpy: RTC for Microsoft Office PowerPoint
            + python_dist: Common library for python-based tools
            + RTCDT: A tool to support the development of Python-based RTC
            + rtc-template: An old tool that provides similar functions to RTCBuilder
            + RTSystemEditor: RTSystem Editor only file
            + VCVerChanger: Tool to specify the version of Visual Studio used
            + WordContrlpy: Python based RTC for Microsoft Office Word
Install to Ubuntu/Debian
The Python version of OpenRTM-aist provides a deb package that is available for Ubuntu and Debian GNU Linux. The supported distribution versions can be found on the download page. Please note that supported versions and support for Ubuntu / Debian GNU Linux are subject to change without notice.
Bulk installation script
Install OpenRTM-aist by using script pkg_install_ubuntu.sh or pkg_install_debian. Download the script from the specified URL and execute it with root privileges. This script installs necessary packages sequentially using apt-get.
By specifying the option, it is possible to install the package depend on the purpose.
For details on downloading the bulk installation script, detailed installation methods, and the options that can be specified, see Bulk Installation Script.
※If the latest version is "1.2.2", you can install "1.2.1" by option and downgrade from "1.2.2" to "1.2.1".
After downloading the bulk installation script, change to the downloaded directory,
For Ubuntu
$ sudo sh pkg_install_ubuntu.sh -l python --yes
For Debian, after getting root privileges using su command.
# sh pkg_install_debian.sh -l python --yes.
Installation of OpenRTP
For development in a general Ubuntu/Debian environment, use RTCBuilder or RTSystemEditor. In that case, OpenRTP is required. You can install OpenRTP using the bulk installation script.
For Ubuntu, at the directory where pkg_install_ubuntu.sh is located
$ sudo sh pkg_install_ubuntu.sh -l openrtp --yes
In the case of Debian, after obtaining root privilage by su
# sh pkg_install_debian.sh -l openrtp --yes
Install JDK8
To run OpenRTP (RTSystemEditor, RTCBuilder, etc.), a Java environment equivalent to JDK8 is required. (In some cases, JDK8 is installed in the default environment, but in Ubuntu 18.04, JDK11 is installed, so JDK8 must be installed.) Note that JDK is not required to use rtshell/rtctree/rtsprofile. If you do not use OpenRTP, you do not need to install JDK8. See below for information on obtaining and installing JDK8.Installation of rtshell
If you want to control RTC with CUI, such as when the control computer is a small system, a tool called rtshell is provided as a tool that can provide the functions equivalent to RTSystemEditor of OpenRTP from CUI. Use the bulk installation script to install rtshell in the directory where the bulk installation script file is located.
For Ubuntu,
 $ sudo sh pkg_install_ubuntu.sh -l rtshell --yes
 $ sudo rtshell_post_install
For Debian, get root priviledge by su
 # sh pkg_install_debian.sh -l rtshell --yes
 # rtshell_post_install
Checking the installation
- When openrtp is installed You can check the installation as the folloing. (An example of 1.2.1.)
 $ dpkg -l 'openrt*'
 Desired=Unknown/Install/Remove/Purge/Hold
 | Status=Not/Inst/Conf-files/Unpacked/halF-conf/Half-inst/trig-aWait/Trig-pend
 |/ Err?=(none)/Reinst-required (Status,Err: uppercase=bad)
 ||/ Name                  Version         Architecture    Description
 +++-=====================-===============-===============-================================================
 ii  openrtm-aist:amd64    1.2.1-0         amd64           OpenRTM-aist, RT-Middleware distributed by AIST
 ii  openrtm-aist-dev:amd6 1.2.1-0         amd64           OpenRTM-aist headers for development
 ii  openrtm-aist-idl:amd6 1.2.1-0         amd64           OpenRTM-aist idls for development
 ii  openrtm-aist-python   1.2.1-0         amd64           OpenRTM-aist, RT-Middleware distributed by AIST
 ii  openrtm-aist-python-d 1.2.1-0         all             Documentation for openrtm-aist-python
 ii  openrtm-aist-python-e 1.2.1-0         amd64           OpenRTM-aist-Python examples
 ii  openrtp:amd64         1.2.1-0         amd64           OpenRTP, Open RT Platform distributed by AIST
- When rtshell is installed instead of openrtp
You can check the installation at the following. (An example of 1.2.1.)
 $ dpkg -l 'openrt*'
 Desired=Unknown/Install/Remove/Purge/Hold
 | Status=Not/Inst/Conf-files/Unpacked/halF-conf/Half-inst/trig-aWait/Trig-pend
 |/ Err?=(none)/Reinst-required (Status,Err: uppercase=bad)
 ||/ Name                  Version         Architecture    Description
 +++-=====================-===============-===============-================================================
 ii  openrtm-aist-python   1.2.1-0         amd64           OpenRTM-aist, RT-Middleware distributed by AIST
 ii  openrtm-aist-python-d 1.2.1-0         all             Documentation for openrtm-aist-python
 ii  openrtm-aist-python-e 1.2.1-0         amd64           OpenRTM-aist-Python examples
To check the Installation of rtshell
 $ pip show rtshell-aist
 Name: rtshell-aist
 Version: 4.2.2
 Summary: Shell commands for managing RT Components and RT Systems.
 Home-page: http://github.com/gbiggs/rtshell
 Author: Geoffrey Biggs and contributors
 Author-email: geoffrey.biggs@aist.go.jp
 License: LGPL3
 Location: /usr/local/lib/python2.7/dist-packages
 Requires: rtctree-aist, rtsprofile-aist
Package Details
The contents of each package are as follows.
openrtm-aist
openrtm-aist contains runtime libraries and commands.
- Commands
 /usr/bin/rtcd
 /usr/bin/rtcprof
 /usr/bin/rtm-config
 /usr/bin/rtm-naming
- License etc.
 /usr/share/doc/openrtm-aist/changelog.gz
 /usr/share/doc/openrtm-aist/README.Debian
 /usr/share/doc/openrtm-aist/README
 /usr/share/doc/openrtm-aist/README.jp
 /usr/share/doc/openrtm-aist/copyright
 /usr/share/doc/openrtm-aist/changelog.Debian.gz
- Configuration file sample
/usr/etc/rtc.conf.sample
- Libraries
- 32 bit
 /usr/lib/i386-linux-gnu/libRTC-X.X.X.so
 /usr/lib/i386-linux-gnu/libRTC.a
 /usr/lib/i386-linux-gnu/libRTC.la
 /usr/lib/i386-linux-gnu/libcoil-X.X.X.so
 /usr/lib/i386-linux-gnu/libcoil.a
 /usr/lib/i386-linux-gnu/librtmCamera.a
 /usr/lib/i386-linux-gnu/librtmCamera.la
 /usr/lib/i386-linux-gnu/librtmCamera.so.X.X.X
 /usr/lib/i386-linux-gnu/librtmManipulator.a
 /usr/lib/i386-linux-gnu/librtmManipulator.la
 /usr/lib/i386-linux-gnu/librtmManipulator.so.X.X.X
 /usr/lib/i386-linux-gnu/openrtm-1.2/ec/FileNameservice.la
 /usr/lib/i386-linux-gnu/openrtm-1.2/ec/FileNameservice.so.X.X.X
 /usr/lib/i386-linux-gnu/openrtm-1.2/ec/LogicalTimeTriggeredEC.a
 /usr/lib/i386-linux-gnu/openrtm-1.2/ec/LogicalTimeTriggeredEC.la
 /usr/lib/i386-linux-gnu/openrtm-1.2/ec/LogicalTimeTriggeredEC.so.X.X.X
 /usr/lib/i386-linux-gnu/openrtm-1.2/sdo/LoggerConsumer.a
 /usr/lib/i386-linux-gnu/openrtm-1.2/sdo/LoggerConsumer.la
 /usr/lib/i386-linux-gnu/openrtm-1.2/sdo/LoggerConsumer.so.X.X.X
 /usr/lib/i386-linux-gnu/openrtm-1.2/ssl/SSLTransport.la
 /usr/lib/i386-linux-gnu/openrtm-1.2/ssl/SSLTransport.so.X.X.X
 /usr/lib/i386-linux-gnu/pigconfig/openrtm-aist.pc
- 64 bit
 /usr/lib/x86_64-linux-gnu/libRTC-X.X.X.so
 /usr/lib/x86_64-linux-gnu/libRTC.a
 /usr/lib/x86_64-linux-gnu/libRTC.la
 /usr/lib/x86_64-linux-gnu/libcoil-X.X.X.so
 /usr/lib/x86_64-linux-gnu/libcoil.a
 /usr/lib/x86_64-linux-gnu/librtmCamera.a
 /usr/lib/x86_64-linux-gnu/librtmCamera.la
 /usr/lib/x86_64-linux-gnu/librtmCamera.so.X.X.X
 /usr/lib/x86_64-linux-gnu/librtmManipulator.a
 /usr/lib/x86_64-linux-gnu/librtmManipulator.la
 /usr/lib/x86_64-linux-gnu/librtmManipulator.so.X.X.X
 /usr/lib/x86_64-linux-gnu/openrtm-1.2/ec/FileNameservice.la
 /usr/lib/x86_64-linux-gnu/openrtm-1.2/ec/FileNameservice.so.X.X.X
 /usr/lib/x86_64-linux-gnu/openrtm-1.2/ec/LogicalTimeTriggeredEC.a
 /usr/lib/x86_64-linux-gnu/openrtm-1.2/ec/LogicalTimeTriggeredEC.la
 /usr/lib/x86_64-linux-gnu/openrtm-1.2/ec/LogicalTimeTriggeredEC.so.X.X.X
 /usr/lib/x86_64-linux-gnu/openrtm-1.2/sdo/LoggerConsumer.a
 /usr/lib/x86_64-linux-gnu/openrtm-1.2/sdo/LoggerConsumer.la
 /usr/lib/x86_64-linux-gnu/openrtm-1.2/sdo/LoggerConsumer.so.X.X.X
 /usr/lib/x86_64-linux-gnu/openrtm-1.2/ssl/SSLTransport.la
 /usr/lib/x86_64-linux-gnu/openrtm-1.2/ssl/SSLTransport.so.X.X.X
 /usr/lib/x86_64-linux-gnu/pigconfig/openrtm-aist.pc
- 32 bit
openrtm-aist-dev
openrtm-aist-dev package includes commands and header files which are needed for software development.
- Commands
 /usr/bin/coil-config
 /usr/bin/rtc-template
 /usr/bin/rtm-skelwrapper
- License etc.
 /usr/share/doc/openrtm-aist-dev/changelog.Debian.gz
 /usr/share/doc/openrtm-aist-dev/changelog.gz
 /usr/share/doc/openrtm-aist-dev/copyright
- Header files etc.
 /usr/include/coil-1.2/coil/Affinity.h
 /usr/include/coil-1.2/coil/Allocator.h
 ...
 /usr/include/coil-1.2/coil/stringutil.h
 /usr/include/openrtm-1.2/rtm/BufferBase.h
 /usr/include/openrtm-1.2/rtm/BufferStatus.h
 ...
 /usr/include/openrtm-1.2/rtm/config_rtc.h
 /usr/include/openrtm-1.2/rtm/ext/CameraCommonInterface.hh
 /usr/include/openrtm-1.2/rtm/ext/CameraCommonInterface.idl
 ...
 /usr/include/openrtm-1.2/rtm/ext/ManipulatorCommonInterface_MiddleStub.h
 /usr/include/openrtm-1.2/rtm/ext/ec/artlinux/ArtExecutionContext.h
 /usr/include/openrtm-1.2/rtm/ext/ec/artlinux/rtc.conf.sample
 /usr/include/openrtm-1.2/rtm/ext/ec/logical_time/LogicalTimeTriggeredEC.h
 /usr/include/openrtm-1.2/rtm/ext/ec/logical_time/LogicalTimeTriggeredEC.idl
 ...
 /usr/include/openrtm-1.2/rtm/ext/ec/logical_time/LogicalTimeTriggeredECStub.h
 /usr/include/openrtm-1.2/rtm/ext/ec/logical_time/idl/LogicalTimeTriggeredEC.hh
 /usr/include/openrtm-1.2/rtm/ext/ec/logical_time/idl/LogicalTimeTriggeredEC.idl
 /usr/include/openrtm-1.2/rtm/ext/ec/logical_time/idl/LogicalTimeTriggeredECDynSK.cc
 /usr/include/openrtm-1.2/rtm/ext/ec/logical_time/idl/LogicalTimeTriggeredECSK.cc
 /usr/include/openrtm-1.2/rtm/ext/ec/rtpreempt
 /usr/include/openrtm-1.2/rtm/ext/ec/rtpreempt/RTPreemptEC.h
 /usr/include/openrtm-1.2/rtm/ext/ec/rtpreempt/rtc.conf.sample
 /usr/include/openrtm-1.2/rtm/ext/local_service/nameservice_file/FileNameservice.h
 /usr/include/openrtm-1.2/rtm/ext/logger/fluentbit_stream/FluentBit.h
 /usr/include/openrtm-1.2/rtm/ext/logger/fluentbit_stream/fluentbit.conf
 /usr/include/openrtm-1.2/rtm/ext/sdo/logger/Logger.hh
 /usr/include/openrtm-1.2/rtm/ext/sdo/logger/Logger.idl
 ...
 /usr/include/openrtm-1.2/rtm/ext/sdo/logger/LoggerStub.h
 /usr/include/openrtm-1.2/rtm/ext/sdo/observer/ComponentObserver.idl
 /usr/include/openrtm-1.2/rtm/ext/sdo/observer/ComponentObserverConsumer.h
 ....
 /usr/include/openrtm-1.2/rtm/ext/sdo/observer/ComponentObserverStub.h
 /usr/include/openrtm-1.2/rtm/ext/sdo/observer/idl/ComponentObserver.hh
 /usr/include/openrtm-1.2/rtm/ext/sdo/observer/idl/ComponentObserver.idl
 /usr/include/openrtm-1.2/rtm/ext/sdo/observer/idl/ComponentObserverDynSK.cc
 /usr/include/openrtm-1.2/rtm/ext/sdo/observer/idl/ComponentObserverSK.cc
 /usr/include/openrtm-1.2/rtm/idl/BasicDataType.hh
 /usr/include/openrtm-1.2/rtm/idl/BasicDataType.idl
 ...
 /usr/include/openrtm-1.2/rtm/idl/device_interfaces/Ranger.idl
 /usr/include/openrtm-1.2/rtm/version.h
 /usr/include/openrtm-1.2/rtm/version.txt
- Libraries and others
- 32 bit
 /usr/lib/i386-linux-gnu/openrtm-1.2/cmake/OpenRTMConfig.cmake
 /usr/lib/i386-linux-gnu/openrtm-1.2/py_helper/README_gen.py
 /usr/lib/i386-linux-gnu/openrtm-1.2/py_helpver/cxx_gen.py
 ...
 /usr/lib/i386-linux-gnu/openrtm-1.2/py_helpver/yat.py
 /usr/lib/i386-linux-gnu/pkgconfig/libcoil.pc
- 64 bit
 /usr/lib/x86_64-linux-gnu/openrtm-1.2/cmake/OpenRTMConfig.cmake
 /usr/lib/x86_64-linux-gnu/openrtm-1.2/py_helper/README_gen.py
 /usr/lib/x86-64-linux-gnu/openrtm-1.2/py_helpver/cxx_gen.py
 ...
 /usr/lib/x86_64-linux-gnu/openrtm-1.2/py_helpver/yat.py
 /usr/lib/x86_64-linux-gnu/pkgconfig/libcoil.pc
- 32 bit
openrtm-aist-python3
The main Python version has been changed from 2 to 3 from OpenRTM-aist 1.2.2.
- Commands
 /usr/bin/rtcd_python3
 /usr/bin/rtcprof_python3
- OpenRTM-aist main modules
usr/lib/python3/dist-packages/OpenRTM-aist/*
- Python search path file for OpenRTM-aist
/usr/lib/python3/dist-packages/OpenRTM_aist.ph
- Utilities
 /usr/lib/python3/dist-packages/OpenRTM_aist/utils/__init__.py
 /usr/lib/python3/dist-packages/OpenRTM_aist/utils/rtc-template/*
 /usr/lib/python3/dist-packages/OpenRTM_aist/utils/rtcd/*
 /usr/lib/python3/dist-packages/OpenRTM_aist/utils/rtcprof/*
 /usr/lib/python3/dist-packages/OpenRTM_aist/utils/rtm-naming/*
openrtm-aist-python3-example
 /usr/share/openrtm-1.2/components/python3/__init__.py
 /usr/share/openrtm-1.2/components/python3/rtcd.conf
 /usr/share/openrtm-1.2/components/python3/components.conf
 /usr/share/openrtm-1.2/components/python3/AutoControl/*
 /usr/share/openrtm-1.2/components/python3/AutoTest/*
 /usr/share/openrtm-1.2/components/python3/Composite/*
 /usr/share/openrtm-1.2/components/python3/ConfigSample/*
 /usr/share/openrtm-1.2/components/python3/ExtTrigger/*
 /usr/share/openrtm-1.2/components/python3/MobileRobotCanvas/*
 /usr/share/openrtm-1.2/components/python3/SeqIO/*
 /usr/share/openrtm-1.2/components/python3/SimpleIO/*
 /usr/share/openrtm-1.2/components/python3/SimpleService/*
 /usr/share/openrtm-1.2/components/python3/Slider_and_Motor/*
 /usr/share/openrtm-1.2/components/python3/Templates/*
 /usr/share/openrtm-1.2/components/python3/Throughput/*
 /usr/share/openrtm-1.2/components/python3/TkJoyStick/
 /usr/share/openrtm-1.2/components/python3/TkLRFViewer/*
openrtm-aist-python3-doc
- Class reference (English)
 /usr/share/openrtm-1.2/doc/python3/ClassReference-en/html/_async_8py.html
 /usr/share/openrtm-1.2/doc/python3/ClassReference-en/html/_buffer_base_8py.html
 ...
 /usr/share/openrtm-1.2/doc/python3/ClassReference-en/html/uuid_8py.html
- Class reference (Japanese)
 /usr/share/openrtm-1.2/doc/python3/ClassReference-jp/html/_async_8py.html
 /usr/share/openrtm-1.2/doc/python3/ClassReference-jp/html/_buffer_base_8py.html
 ...
 /usr/share/openrtm-1.2/doc/python3/ClassReference-jp/html/uuid_8py.html
openrtp
In openrtp installation, since so many files are installed, the listing is not made. Depend on your needs, use the following command.
$ dpkg -L openrtp
rtshell
- Scripts for the commands
 /usr/local/bin/rtact
 /usr/local/bin/rtcat
 /usr/local/bin/rtcheck
 /usr/local/bin/rtcomp
 /usr/local/bin/rtcon
 /usr/local/bin/rtconf
 /usr/local/bin/rtcryo
 /usr/local/bin/rtdeact
 /usr/local/bin/rtdel
 /usr/local/bin/rtdis
 /usr/local/bin/rtdoc
 /usr/local/bin/rtexit
 /usr/local/bin/rtfind
 /usr/local/bin/rtfsm
 /usr/local/bin/rtinject
 /usr/local/bin/rtlog
 /usr/local/bin/rtls
 /usr/local/bin/rtmgr
 /usr/local/bin/rtprint
 /usr/local/bin/rtpwd
 /usr/local/bin/rtreset
 /usr/local/bin/rtresurrect
 /usr/local/bin/rtshell_post_install
 /usr/local/bin/rtstart
 /usr/local/bin/rtstodot
 /usr/local/bin/rtstop
 /usr/local/bin/rtteardown
 /usr/local/bin/rtvlog
 /usr/local/bin/rtwatch
- Main code for the commans (An example of Ubuntu20.04.)
 /usr/local/lib/python3.8/dist-packages/rtctree/*
 /usr/local/lib/python3.8/dist-packages/rtshell/*
 /usr/local/lib/python3.8/dist-packages/rtsprofile/*
- Package information (An example of Ubuntu20.04.)
 /usr/local/lib/python3.8/dist-packages/rtctree_aist-4.2.0.egg-info/*
 /usr/local/lib/python3.8/dist-packages/rtshell_aist-4.2.2.dist-info/*
 /usr/local/lib/python3.8/dist-packages/rtsprofile_aist-4.1.2.dist-info/*
Install on Raspbian
OpenRTM-aist-Python is provided with deb packages for Raspbian for the Raspberry Pi. Please note that support for Raspbian and its versions are subject to change or suspension without notice.
Supported version
The version of Raspbian for which packages are currently available is- Buster
SD card preparation
Download OS Image
Download the Rasbian image (the image ”Raspbian Buster with desktop and recommended software” is recommended but you can select another image if necessary) from the link below, unzip and write to SD card. The capacity of the SD card should be more than 4GB.Write to SD card
Please refer to RPi Easy SD Card Setup for how to write to SD card. The link shows several options. Here's an overview of some of them:
For Windows
- Write using Win32 Disk Imager.
Using Windows is relatively easier than using Linux or Mac OS. Then if you are a beginner, using Windows is recommended.
For Linux and Mac OS
- Write using the dd command as follows.
 $ sudo dd of=/dev/<device file of SD card> if=<image file downloaded and decompressed> bs=4M status=progress
 $ sudo sync
Writing to an SD card with the above command requires a fairly long time. (Several minutes to ten several minutes). To find the device file name of the SD card, type in:
$ df -h
And find out which device is the SD card from the displayed device size. For example, if you are using a 16GB SD card that currently has Rasbian installed, one device will appear as a 14GB device and that device will appear as /dev/sdf7. Other devices that differ only in the last number, such as /dev/sdf5 and /dev/sdf6, are displayed too. These are the device names used for the SD card. Umount all of these devices as follows:
 $ umount /dev/sdf5
 $ umount /dev/sdf6
 $ umount /dev/sdf7
After that, execute the above dd command. The device file name in the case is /dev/sdf.
Install OpenRTM-aist-Python
Download the bulk installation script "pkg_install_raspbian.sh" from the specified URL and execute it with root privileges. This script installs necessary packages sequentially using apt-get.
By specifying the option, it is possible to install the packages which align with your purpose. Download the bulk installation script and execute it with root privilege.
$ sudo sh pkg_install_raspbian.sh -l python --yes.
For details on downloading the bulk installation script, detailed installation methods, and the options that can be specified, see Bulk Installation Script:.
Installing rtshell
rtshell is required if you want to install RTC on Raspbian and control RTC locally from the Raspbian host. To install rtshell using the bulk installation script, at the directory which file pkg_install_raspbian.sh is, type
 $ sudo sh pkg_install_raspbian.sh -l rtshell --yes
 $ sudo rtshell_post_install
Check the installation
You can check the installation as the following.
 $ dpkg -l 'openrt*'
 Desired=Unknown/Install/Remove/Purge/Hold
 | Status=Not/Inst/Conf-files/Unpacked/halF-conf/Half-inst/trig-aWait/Trig-pend
 |/ Err?=(none)/Reinst-required (Status,Err: uppercase=bad)
 ||/ Name                  Version         Architecture    Description
 +++-=====================-===============-===============-================================================
 ii  openrtm-aist-python   1.2.1-0         amd64           OpenRTM-aist, RT-Middleware distributed by AIST
 ii  openrtm-aist-python-d 1.2.1-0         all             Documentation for openrtm-aist-python
 ii  openrtm-aist-python-e 1.2.1-0         amd64           OpenRTM-aist-Python examples
 $ pip show rtshell-aist
 Name: rtshell-aist
 Version: 4.2.2
 Summary: Shell commands for managing RT Components and RT Systems.
 Home-page: http://github.com/gbiggs/rtshell
 Author: Geoffrey Biggs and contributors
 Author-email: geoffrey.biggs@aist.go.jp
 License: LGPL3
 Location: /usr/local/lib/python2.7/dist-packages
 Requires: rtctree-aist, rtsprofile-aist
Package details
Each package contains the followings:
openrtm-aist-python
- Commands
 /usr/bin/rtcd_python
 /usr/bin/rtcprof_python
- OpenRTM-aist-Python main modules
usr/lib/python2.7/dist-packages/OpenRTM-aist/*
- Python search path file for OpenRTM-aist
/usr/lib/python2.7/dist-packages/OpenRTM_aist.ph
- Utilities
 /usr/lib/python2.7/dist-packages/OpenRTM_aist/utils/__init__.py
 /usr/lib/python2.7/dist-packages/OpenRTM_aist/utils/rtc-template/*
 /usr/lib/python2.7/dist-packages/OpenRTM_aist/utils/rtcd/*
 /usr/lib/python2.7/dist-packages/OpenRTM_aist/utils/rtcprof/*
 /usr/lib/python2.7/dist-packages/OpenRTM_aist/utils/rtm-naming/*
openrtm-aist-python-example
 /usr/share/openrtm-1.2/components/python/__init__.py
 /usr/share/openrtm-1.2/components/python/rtcd.conf
 /usr/share/openrtm-1.2/components/python/components.conf
 /usr/share/openrtm-1.2/components/python/AutoControl/*
 /usr/share/openrtm-1.2/components/python/AutoTest/*
 /usr/share/openrtm-1.2/components/python/Composite/*
 /usr/share/openrtm-1.2/components/python/ConfigSample/*
 /usr/share/openrtm-1.2/components/python/ExtTrigger/*
 /usr/share/openrtm-1.2/components/python/MobileRobotCanvas/*
 /usr/share/openrtm-1.2/components/python/SeqIO/*
 /usr/share/openrtm-1.2/components/python/SimpleIO/*
 /usr/share/openrtm-1.2/components/python/SimpleService/*
 /usr/share/openrtm-1.2/components/python/Slider_and_Motor/*
 /usr/share/openrtm-1.2/components/python/Templates/*
 /usr/share/openrtm-1.2/components/python/Throughput/*
 /usr/share/openrtm-1.2/components/python/TkJoyStick/
 /usr/share/openrtm-1.2/components/python/TkLRFViewer/*
openrtm-aist-python-doc
- Class reference (English)
 /usr/share/openrtm-1.2/doc/python/ClassReference-en/html/_async_8py.html
 /usr/share/openrtm-1.2/doc/python/ClassReference-en/html/_buffer_base_8py.html
 ...
 /usr/share/openrtm-1.2/doc/python/ClassReference-en/html/uuid_8py.html
- Class reference (Japanese)
 /usr/share/openrtm-1.2/doc/python/ClassReference-jp/html/_async_8py.html
 /usr/share/openrtm-1.2/doc/python/ClassReference-jp/html/_buffer_base_8py.html
 ...
 /usr/share/openrtm-1.2/doc/python/ClassReference-jp/html/uuid_8py.html
rtshell
- Scripts for the commands
 /usr/local/bin/rtact
 /usr/local/bin/rtcat
 /usr/local/bin/rtcheck
 /usr/local/bin/rtcomp
 /usr/local/bin/rtcon
 /usr/local/bin/rtconf
 /usr/local/bin/rtcryo
 /usr/local/bin/rtdeact
 /usr/local/bin/rtdel
 /usr/local/bin/rtdis
 /usr/local/bin/rtdoc
 /usr/local/bin/rtexit
 /usr/local/bin/rtfind
 /usr/local/bin/rtfsm
 /usr/local/bin/rtinject
 /usr/local/bin/rtlog
 /usr/local/bin/rtls
 /usr/local/bin/rtmgr
 /usr/local/bin/rtprint
 /usr/local/bin/rtpwd
 /usr/local/bin/rtreset
 /usr/local/bin/rtresurrect
 /usr/local/bin/rtshell_post_install
 /usr/local/bin/rtstart
 /usr/local/bin/rtstodot
 /usr/local/bin/rtstop
 /usr/local/bin/rtteardown
 /usr/local/bin/rtvlog
 /usr/local/bin/rtwatch
- Main code for the commands
 /usr/local/lib/python2.7/dist-packages/rtctree/*
 /usr/local/lib/python2.7/dist-packages/rtshell/*
 /usr/local/lib/python2.7/dist-packages/rtsprofile/*
- Package information
 /usr/local/lib/python2.7/dist-packages/rtctree_aist-4.2.0.egg-info/*
 /usr/local/lib/python2.7/dist-packages/rtshell_aist-4.2.2.dist-info/*
 /usr/local/lib/python2.7/dist-packages/rtsprofile_aist-4.1.2.dist-info/*
Installation on Fedora
Now 1.2 series of OpenRTM-aist does not fully support Fedora OS. Then please use the information on this page as non-validated one.
OpenRTM-aist-Python is provided with an RPM package that can be used with Fedora Linux. The supported Fedora Linux versions can be found from the download page. Please note that support for Fedora Linux and its versions are subject to change or suspension without notice.
There are two main types of installation methods for Fedora Linux.- Use the bulk installation script provided by openrtm.org
- Use yum package manager
Bulk installation script
Download the installation script "pkg_install_fedora.sh" provided by openrtm.org from the download page and execute it with root privileges. This script installs necessary packages sequentially using yum.
It is very convenient because it installs all the packages required to develop and execute OpenRTM-aist.
By specifying the option, it is possible to install the package that suits the purpose. To install OpenRTM-aist-Python, download the bulk install script and then type
$ sudo sh pkg_install_fedora.sh -l python --yes
For details on how to download the bulk installation script, detailed installation methods, and the types of options that can be specified, see the Bulk Installation Script.
Install OpenRTP
RTC Builder and RTSystemEditor can be used for general Ubuntu/Debian environment development. To use them, OpenRTP is required. Install OpenRTP using the bulk installation script. In Ubuntu, in the directory where pkg_install_ubuntu.sh is located, type
$ sudo sh pkg_install_fedora.sh -l openrtp --yes
At present, in the bulk installation script for Fedora, after installing the environment for Python with -l python, if you install -l openrtp, there is a problem that some of the files necessary for executing OpenRTP are not installed. To avoid the problem, you need to install OpenRTM-aist package manually. For it, type:
$ sudo yam install OpenRTM-aist
Install JDK8
To run OpenRTP (RTSystemEditor, RTC Builder, etc.), a Java environment equivalent to JDK8 is required. At present, in the Fedora environment, the bulk installation script installs OpenJDK8 from the Fedora rpm repository. If you want to install another JDK8, please refer to the link below. By the way, JDK is not required to use rtshell/rtctree/rtsprofile, so if you do not use OpenRTP, you do not need to install JDK8. See below for information on obtaining and installing JDK8.Install rtshell
If you want to control the RTC with the CUI, such as when the control computer system is small, a tool called rtshell is provided as a tool that allows you to execute functions equivalent to RTSystemEditor of OpenRTP from the CUI. To install rtshell, use a bulk installation script on the terminal and enter the following in the directory where the bulk installation script file is located.
$ sudo sh pkg_install_fedora.sh -l rtshell --yes
How to use yum and pip
Create /etc/yum.repos.d/openrtm.repo
openrtm.org provides a package repository available from yum. However, it is not included in the default package repository, so you need to change the setting of yum.
Create a file /etc/yum.repos.d/openrtm.repo that contains the following settings. Creation usually requires root privileges.
 [openrtm]
 name=Fedora $releasever - $basearch
 failovermethod=priority
 baseurl=http://openrtm.org/pub/Linux/Fedora/releases/$releasever/Fedora/$basearch/os/Packages
 enabled=1
 gpgcheck=0
 gpgkey=file:///etc/pki/rpm-gpg/RPM-GPG-KEY-fedora file:///etc/pki/rpm-gpg/RPM-GPG-KEY
Installation by using yum
After creating openrtm.repo, install it according to the following procedure. On the way, you will be asked for some responses, so complete by typing `` y ''.
- Install OpenRTM-aist-Python
 $ sudo yum install gcc-c ++ python
 $ sudo yum install omniORB omniORB-devel omniORB-doc omniORB-servers omniORB-utils
 $ sudo yum install OpenRTM-aist-Python OpenRTM-aist-Python-doc OpenRTM-aist-Python-example
- Install OpenRTP
 $ sudo yum install OpenRTP
 $ sudo yum install OpenRTM-aist
- Install rtshell
$ sudo pip3 install rtshell-aist
Confirm installation
You can check the installation with the following command.
- If you installed OpenRTP too,
 $ rpm -qa OpenRT*
 OpenRTM-aist-devel-1.2.0-0.fc29.x86_64
 OpenRTM-aist-Python-1.2.0-0.29.x86_64
 OpenRTM-aist-Python-example-1.2.0-0.29.x86_64
 OpenRTP-1.2.0-1.fc29.x86_64
 OpenRTM-aist-1.2.0-0.fc29.x86_64
 OpenRTM-aist-Python-doc-1.2.0-0.29.x86_64
- If you did not install OpenRTP
 $ rpm -qa OpenRT*
 OpenRTM-aist-Python-1.2.0-0.29.x86_64
 OpenRTM-aist-Python-example-1.2.0-0.29.x86_64
 OpenRTM-aist-Python-doc-1.2.0-0.29.x86_64
- To check rtshell installation:
 $ pip3 show rtshell-aist
 Name: rtshell-aist
 Version: 4.2.2
 Summary: Shell commands for managing RT Components and RT Systems.
 Home-page: http://github.com/gbiggs/rtshell
 Author: Geoffrey Biggs and contributors
 Author-email: geoffrey.biggs@aist.go.jp
 License: LGPL3
 Location: /usr/local/lib/python3.7/dist-packages
 Requires: rtctree-aist, rtsprofile-aist
Package details
Each package contains: (In case of 64bit Fedora)
OpenRTM-aist-Python
- Commands
 /usr/bin/rtcd_python
 /usr/bin/rtcprof_python
- OpenRTM-aist main python modules
usr/lib/python3.7/site-packages/OpenRTM-aist/*
- Python search path file for OpenRTM-aist
/usr/lib/python3.7/site-packages/OpenRTM_aist.ph
- Utilities
 /usr/lib/python3.7/site-packages/OpenRTM_aist/utils/__init__.py
 /usr/lib/python3.7/site-packages/OpenRTM_aist/utils/rtc-template/*
 /usr/lib/python3.7/site-packages/OpenRTM_aist/utils/rtcd/*
 /usr/lib/python3.7/site-packages/OpenRTM_aist/utils/rtcprof/*
 /usr/lib/python3.7/site-packages/OpenRTM_aist/utils/rtm-naming/*
openrtm-aist-python-example
 /usr/share/openrtm-1.2/components/python/__init__.py
 /usr/share/openrtm-1.2/components/python/rtcd.conf
 /usr/share/openrtm-1.2/components/python/components.conf
 /usr/share/openrtm-1.2/components/python/AutoControl/*
 /usr/share/openrtm-1.2/components/python/AutoTest/*
 /usr/share/openrtm-1.2/components/python/Composite/*
 /usr/share/openrtm-1.2/components/python/ConfigSample/*
 /usr/share/openrtm-1.2/components/python/ExtTrigger/*
 /usr/share/openrtm-1.2/components/python/MobileRobotCanvas/*
 /usr/share/openrtm-1.2/components/python/SeqIO/*
 /usr/share/openrtm-1.2/components/python/SimpleIO/*
 /usr/share/openrtm-1.2/components/python/SimpleService/*
 /usr/share/openrtm-1.2/components/python/Slider_and_Motor/*
 /usr/share/openrtm-1.2/components/python/Templates/*
 /usr/share/openrtm-1.2/components/python/Throughput/*
 /usr/share/openrtm-1.2/components/python/TkJoyStick/
 /usr/share/openrtm-1.2/components/python/TkLRFViewer/*
openrtm-aist-python-doc
- Class reference (English)
 /usr/share/openrtm-1.2/doc/python/ClassReference-en/html/_async_8py.html
 /usr/share/openrtm-1.2/doc/python/ClassReference-en/html/_buffer_base_8py.html
 ...
 /usr/share/openrtm-1.2/doc/python/ClassReference-en/html/uuid_8py.html
- Class reference (Japanese)
 /usr/share/openrtm-1.2/doc/python/ClassReference-jp/html/_async_8py.html
 /usr/share/openrtm-1.2/doc/python/ClassReference-jp/html/_buffer_base_8py.html
 ...
 /usr/share/openrtm-1.2/doc/python/ClassReference-jp/html/uuid_8py.html
OpenRTM-aist
openrtm-aist contains runtime libraries and commands.
- Configuration file sample
/etc/rtc.conf.sample
- Commands
 /usr/bin/rtcd
 /usr/bin/rtcprof
 /usr/bin/rtm-config
 /usr/bin/rtm-naming
- Libraries
 /usr/lib64/libRTC-1.2.0.so
 /usr/lib64/libRTC.a
 /usr/lib64/libRTC.la
 ...
 /usr/lib64/librtmManipulator.so.0.0.0
 /usr/lib64/openrtm-1.2/ec/FileNameservice.la
 /usr/lib64/openrtm-1.2/ec/FileNameservice.so
 ...
 /usr/lib64/openrtm-1.2/ssl/SSLTransport.so.0.0.0
OpenRTM-aist-devel
openrtm-aist-dev contains commands file and heder files which is used for software development.
- Commands
 /usr/bin/coil-config
 /usr/bin/rtc-template
 /usr/bin/rtm-skelwrapper
- Header files
 /usr/include/coil-1.2/coil/Affinity.h
 /usr/include/coil-1.2/coil/Allocator.h
 ...
 /usr/include/coil-1.2/coil/stringutil.h
 /usr/include/openrtm-1.2/rtm/BufferBase.h
 /usr/include/openrtm-1.2/rtm/BufferStatus.h
 ...
 /usr/include/openrtm-1.2/rtm/version.txt
 /usr/include/openrtm-1.2/rtm/ext/CameraCommonInterface.hh
 /usr/include/openrtm-1.2/rtm/ext/CameraCommonInterface.idl
 ...
 /usr/include/openrtm-1.2/rtm/ext/ManipulatorCommonInterface_MiddleStub.h
 /usr/include/openrtm-1.2/rtm/ext/ec/artlinux/ArtExecutionContext.h
 /usr/include/openrtm-1.2/rtm/ext/ec/artlinux/rtc.conf.sample
 /usr/include/openrtm-1.2/rtm/ext/ec/logical_time/LogicalTimeTriggeredEC.h
 /usr/include/openrtm-1.2/rtm/ext/ec/logical_time/LogicalTimeTriggeredEC.idl
 ...
 /usr/include/openrtm-1.2/rtm/ext/ec/logical_time/LogicalTimeTriggeredECStub.h
 /usr/include/openrtm-1.2/rtm/ext/ec/rtpreempt/RTPreemptEC.h
 /usr/include/openrtm-1.2/rtm/ext/ec/rtpreempt/rtc.conf.sample
 /usr/include/openrtm-1.2/rtm/ext/local_service/nameservice_file
 /usr/include/openrtm-1.2/rtm/ext/local_service/nameservice_file/FileNameservice.h
 /usr/include/openrtm-1.2/rtm/ext/logger/fluentbit_stream/FluentBit.h
 /usr/include/openrtm-1.2/rtm/ext/logger/fluentbit_stream/fluentbit.conf
 /usr/include/openrtm-1.2/rtm/ext/sdo/logger/Logger.hh
 /usr/include/openrtm-1.2/rtm/ext/sdo/logger/Logger.idl
 ...
 /usr/include/openrtm-1.2/rtm/ext/sdo/logger/LoggerStub.h
- IDL and stab skeleton
 /usr/include/openrtm-1.2/rtm/ext/sdo/observer/ComponentObserver.idl
 /usr/include/openrtm-1.2/rtm/ext/sdo/observer/ComponentObserverConsumer.h
 ...
 /usr/include/openrtm-1.2/rtm/ext/sdo/observer/ComponentObserverStub.h
 /usr/include/openrtm-1.2/rtm/ext/ec/logical_time/idl/LogicalTimeTriggeredEC.hh
 /usr/include/openrtm-1.2/rtm/ext/ec/logical_time/idl/LogicalTimeTriggeredEC.idl
 /usr/include/openrtm-1.2/rtm/ext/ec/logical_time/idl/LogicalTimeTriggeredECDynSK.cc
 /usr/include/openrtm-1.2/rtm/ext/ec/logical_time/idl/LogicalTimeTriggeredECSK.cc
 /usr/include/openrtm-1.2/rtm/ext/sdo/observer/idl/ComponentObserver.hh
 /usr/include/openrtm-1.2/rtm/ext/sdo/observer/idl/ComponentObserver.idl
 /usr/include/openrtm-1.2/rtm/ext/sdo/observer/idl/ComponentObserverDynSK.cc
 /usr/include/openrtm-1.2/rtm/ext/sdo/observer/idl/ComponentObserverSK.cc
 /usr/include/openrtm-1.2/rtm/idl/BasicDataType.hh
 /usr/include/openrtm-1.2/rtm/idl/BasicDataType.idl
 ...
 /usr/include/openrtm-1.2/rtm/idl/SharedMemoryStub.h
 /usr/include/openrtm-1.2/rtm/idl/device_interfaces/AIO.idl
 /usr/include/openrtm-1.2/rtm/idl/device_interfaces/ActArray.idl
 ...
 /usr/include/openrtm-1.2/rtm/idl/device_interfaces/Ranger.idl
- Libraries
 /usr/lib64/openrtm-1.2/cmake/OpenRTMConfig.cmake
 /usr/lib64/openrtm-1.2/py_helper/README_gen.py
 /usr/lib64/openrtm-1.2/py_helper/cxx_gen.py
 ...
 /usr/lib64/openrtm-1.2/py_helper/yat.py
 /usr/lib64/pkgconfig/libcoil.pc
 /usr/lib64/pkgconfig/openrtm-aist.pc
OpenRTP
In openrtp installation, since so many files are installed, the listing is not made. Depend on your needs, use the following command.
$ dpkg -L openrtp
rtshell
- Scripts for the commands
 /usr/local/bin/rtact
 /usr/local/bin/rtcat
 /usr/local/bin/rtcheck
 /usr/local/bin/rtcomp
 /usr/local/bin/rtcon
 /usr/local/bin/rtconf
 /usr/local/bin/rtcryo
 /usr/local/bin/rtdeact
 /usr/local/bin/rtdel
 /usr/local/bin/rtdis
 /usr/local/bin/rtdoc
 /usr/local/bin/rtexit
 /usr/local/bin/rtfind
 /usr/local/bin/rtfsm
 /usr/local/bin/rtinject
 /usr/local/bin/rtlog
 /usr/local/bin/rtls
 /usr/local/bin/rtmgr
 /usr/local/bin/rtprint
 /usr/local/bin/rtpwd
 /usr/local/bin/rtreset
 /usr/local/bin/rtresurrect
 /usr/local/bin/rtshell_post_install
 /usr/local/bin/rtstart
 /usr/local/bin/rtstodot
 /usr/local/bin/rtstop
 /usr/local/bin/rtteardown
 /usr/local/bin/rtvlog
 /usr/local/bin/rtwatch
- Main code for the commands
 /usr/local/lib/python3.7/dist-packages/rtctree/*
 /usr/local/lib/python3.7/dist-packages/rtshell/*
 /usr/local/lib/python3.7/dist-packages/rtsprofile/*
- Package information
 /usr/local/lib/python3.7/dist-packages/rtctree_aist-4.2.0.egg-info/*
 /usr/local/lib/python3.7/dist-packages/rtshell_aist-4.2.2.dist-info/*
 /usr/local/lib/python3.7/dist-packages/rtsprofile_aist-4.1.2.dist-info/*
Operation Check (On Windows)
Location of sample components
After successful installation or build, test the operation with the attached sample. Samples are usually located at:
- c:\Program Files\OpenRTM-aist\1.2.x\Components\Python
- <Source directory>/OpenRTM-aist/examples (when building from source)
Check that OpenRTM-aist is built and installed correctly using the sample component set SimpleIO.
Operation check using sample (SimpleIO)
This is a sample set consisting of RT components ConsoleIn and ConsoleOut. ConsoleIn is a component that outputs numerical values input from the console to OutPort, and ConsoleOut is a component that displays numerical values input from InPort to the console. These are RTC samples to show a simple I/O (input/output) use. It works by connecting the data ports from ConsoleIn's OutPort to ConsoleOut's InPort and activating these two components.
Operation check environment
The following describes how to use OpenRTP when starting various programs from the Start menu in an environment where OpenRTM-aist is installed by default with the MSI installer. When using RTShell without using OpenRTP, refer to Operation Check (Windows) under "Install rtshell" page. If you build the source, the sample components are located in <Source directory>\OpenRTM-aist\examples\SimpleIO. Please replace the location of ConsoleIn/ConsoleOut in the explanation below and in the link by it.
Operation check procedure
Start RTSystemEditor and the name server
Follow the steps below to start RTSystemEditor and the name server.
Start sample component
After starting the name server, start the appropriate sample component.
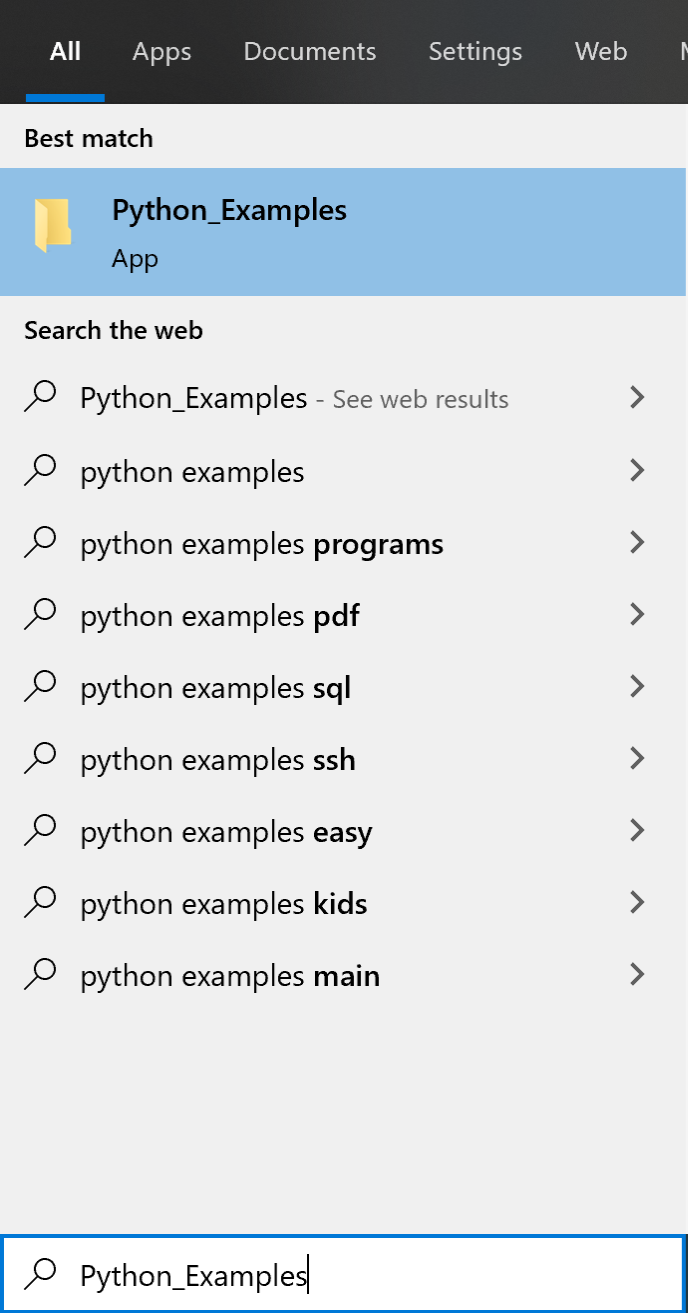
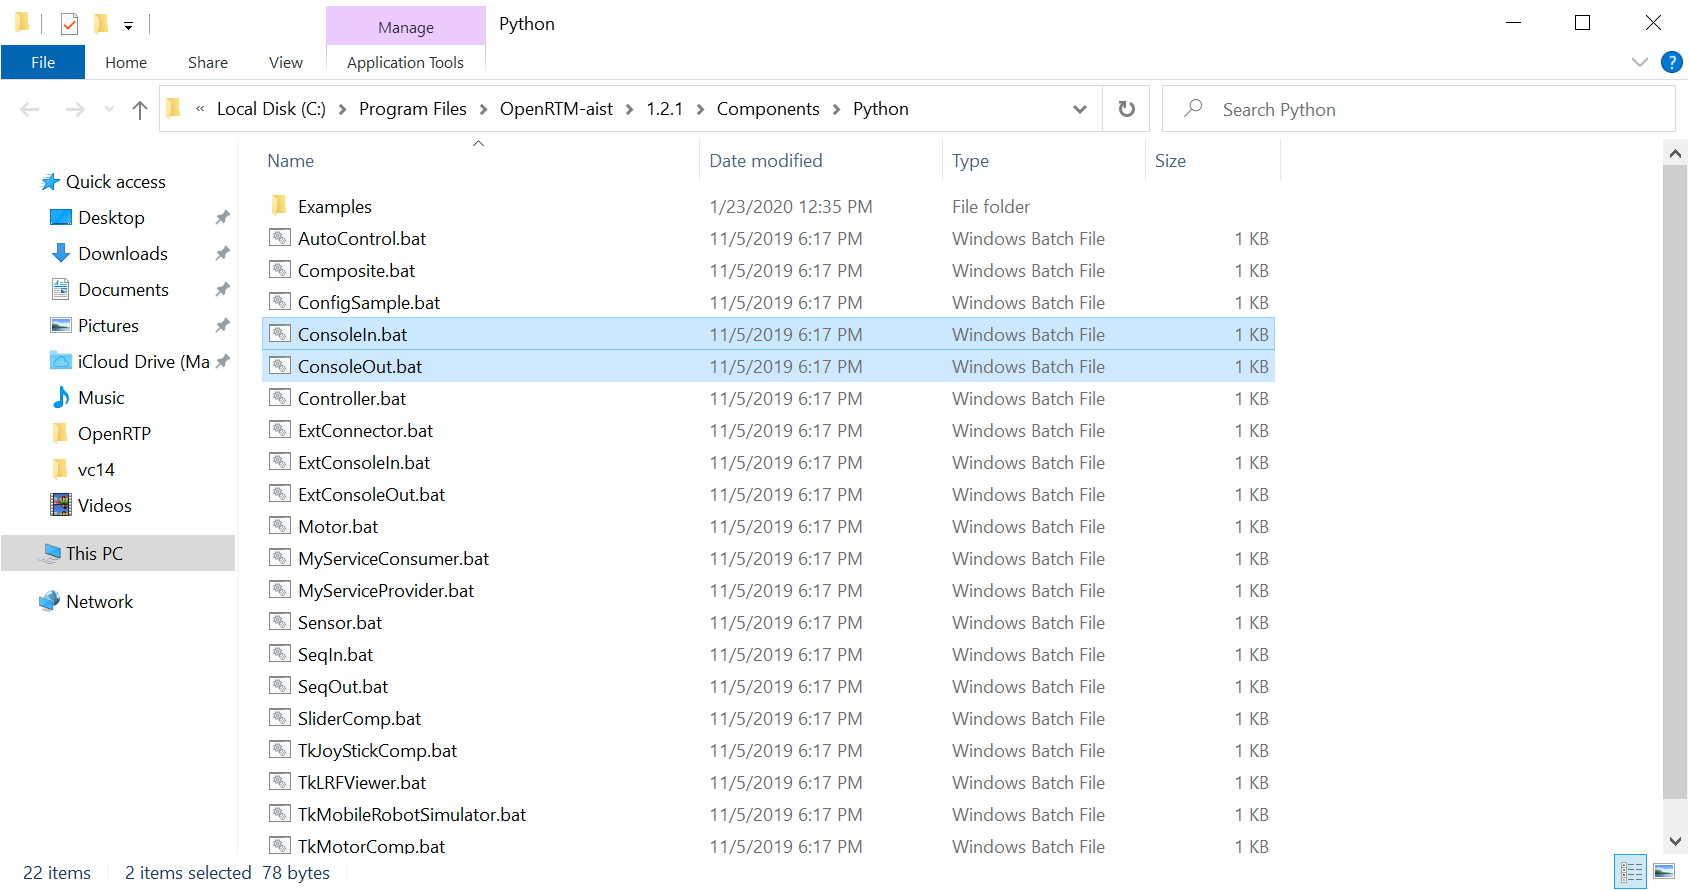
In the case of Windows 10, enter "Python_Examples" in [Type here to search] on the lower right to open the directory of examples.
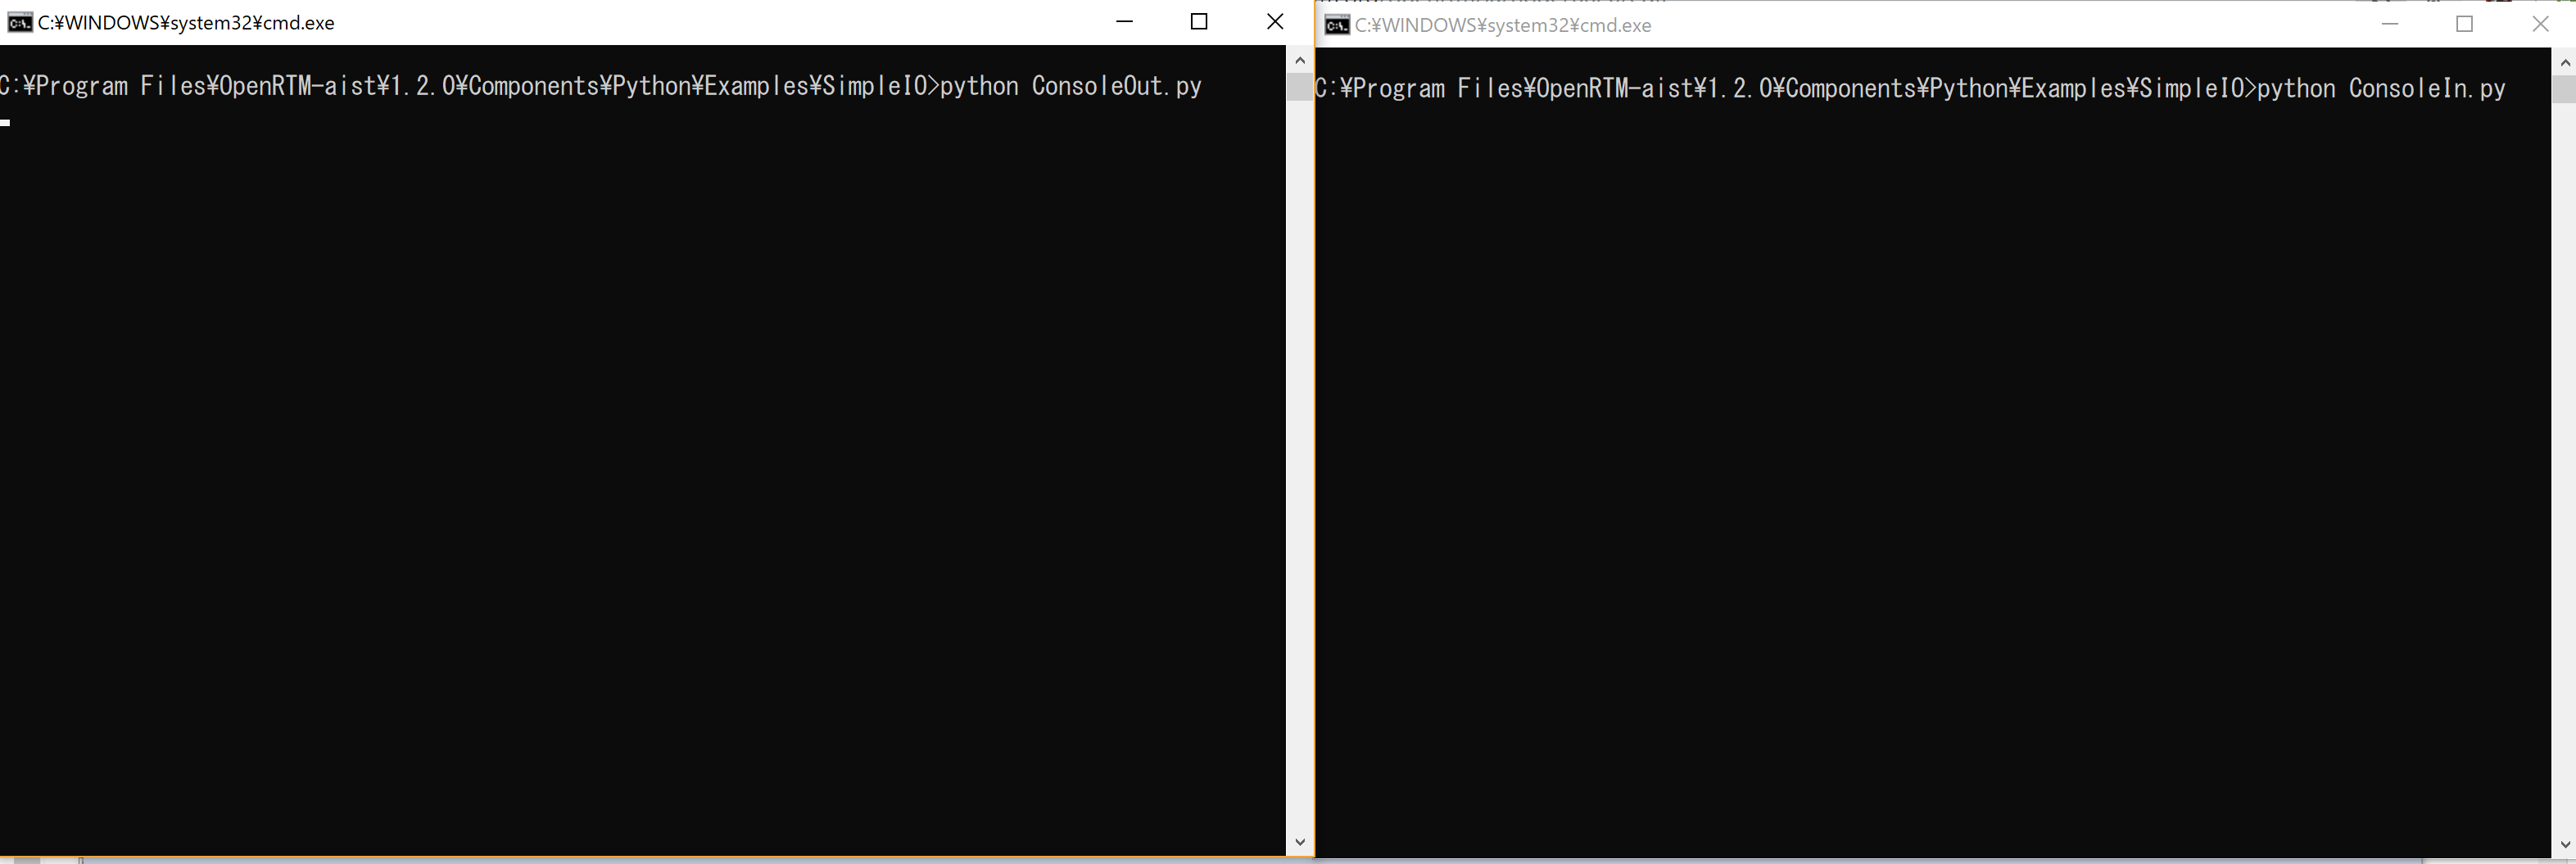
- Double-click "ConsoleIn.bat" and "ConsoleOut.bat" respectively to start two components. When started, two console screens as shown below will open. ConsoleIn and ConsoleOut components
If the component does not start
If a component does not start, there are several possible causes.
Console screen opens and disappears immediately
There are cases where there is a problem with the settings of rtc.conf and it cannot start. Open [rtc.conf for examples] in the above searched directory and check the settings. For example, if settings such as corba.endpoint/corba.endpoints are mismatched with the host address of the currently running PC, CORBA will terminate abnormally.
Please reset it to the following minimum rtc.conf and try again.
corba.nameservers: localhost
omniORBpy is not installed.
omniORBpy is included in the MSI installer provided by openrtm.org, but if you choose a custom installation, you can install OpenRTM-aist-Python without installing omniORBpy. Also, if you have installed it manually, you may not have omniORBpy installed. Check if omniORBpy is installed.
The association of py files is different
The file that starts ConsoleIn and ConsoleOut is
c:\Program Files\OpenRTM-aist\1.2.x\Components\Python\Examples\SimpleIO\ConsoleIn.py
c:\Program Files\OpenRTM-aist\1.2.x\Components\Python\Examples\SimpleIO\ConsoleOut.py
Note that the location is the location of the case that you installed OpenRTM-aist by using 64-bit MSI.
Open the console screen in this directory and start it by executing python ConsoleIn.py, but if you can not start by double-clicking ConsoleIn.py, please check the installed python. If both 32-bit and 64-bit versions of Python are installed, the one installed first will be associated with the py file, so installing Python of the same architecture as the OpenRTM-aist-Python installer may solve it first Maybe.
Other
There are cases where the startup does not work properly due to problems with the hostname and address settings. In that case, if you tell omniNames.exe the IP address of the PC you are using, it may work. Set the environment variable OMNIORB_USEHOSTNAME as follows (example below is when the IP address of the local host is 192.168.0.11).
Variable name (N): OMNIORB_USEHOSTNAME Variable value (V): 192.168.0.11
Place the components on the system diagram
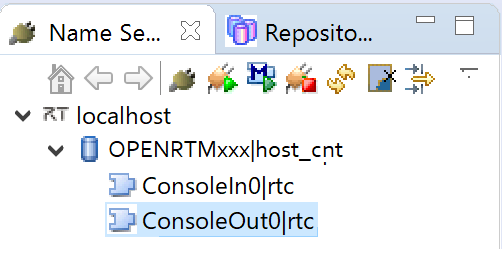
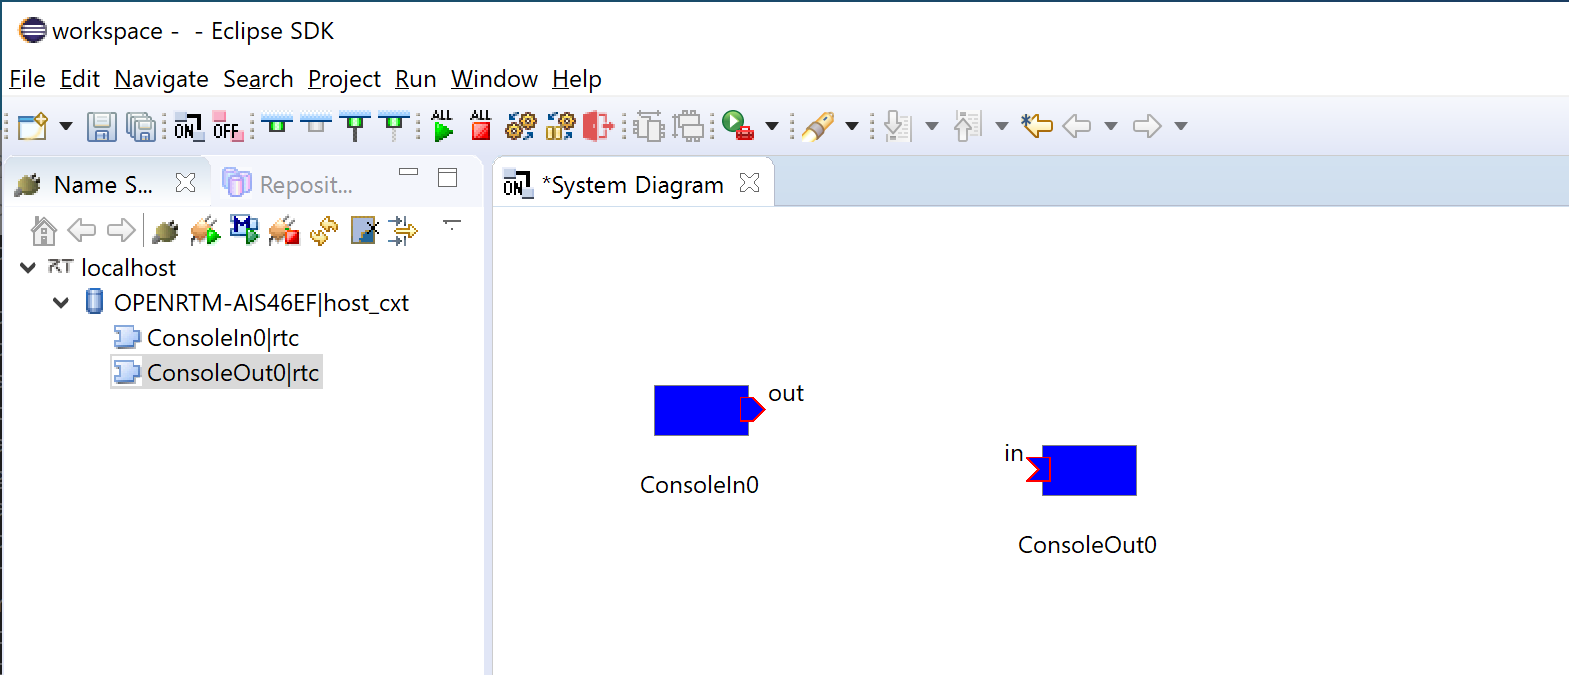
- Click [>] next to [localhost] in the tree view of the RTSystemEditor, and click [>] next to the
 icon. You may see the two components icons in the above step. ConsoleIn and ConsoleOut components
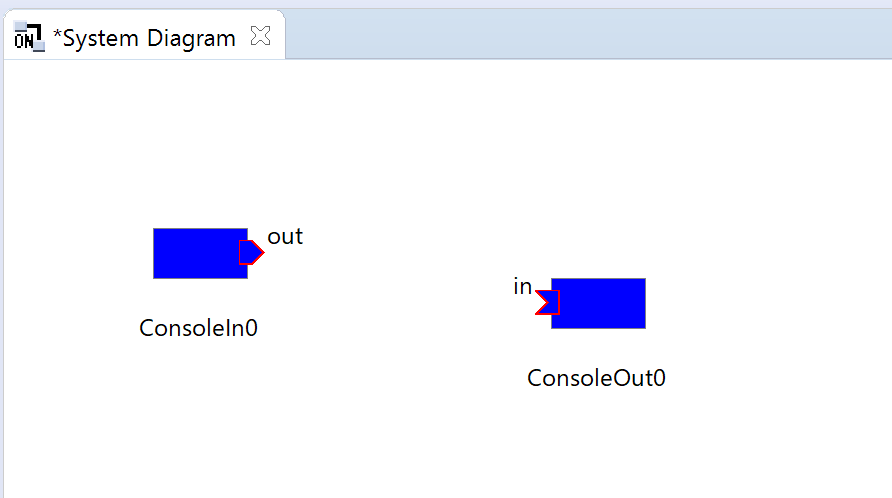
Open the system editor (system diagram) for editing the system. Click the [Open New System Editor] button ![]() at the top to open the system editor (system diagram) in the center pane. From the name service view on the left, drag and drop the components (two) indicated by the
at the top to open the system editor (system diagram) in the center pane. From the name service view on the left, drag and drop the components (two) indicated by the ![]() icon onto the system diagram view in the center.
icon onto the system diagram view in the center.
Connect and activate
You can see an OutPort ![]() where data is output to and is shown on the right side of the ConsoleIn0 component and an InPort
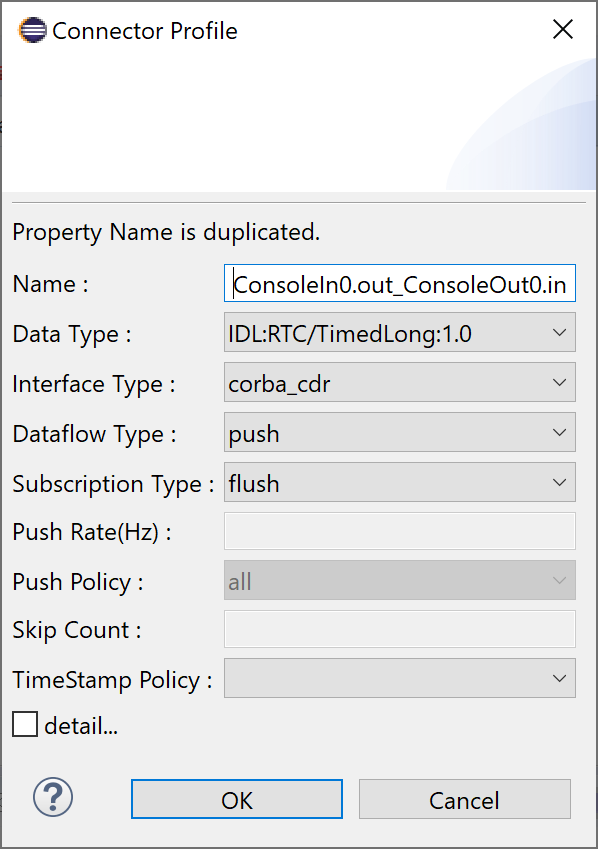
where data is output to and is shown on the right side of the ConsoleIn0 component and an InPort ![]() where data is input from and is shown on the left side of the ConsoleOut0 component like the following figure. Connect these InPort/OutPort (these are called "data port"). If you drag and drop from the OutPort to the InPort (or from the InPort to the OutPort), a dialog as shown below appears. Click the [OK] button with the default settings.
where data is input from and is shown on the left side of the ConsoleOut0 component like the following figure. Connect these InPort/OutPort (these are called "data port"). If you drag and drop from the OutPort to the InPort (or from the InPort to the OutPort), a dialog as shown below appears. Click the [OK] button with the default settings.
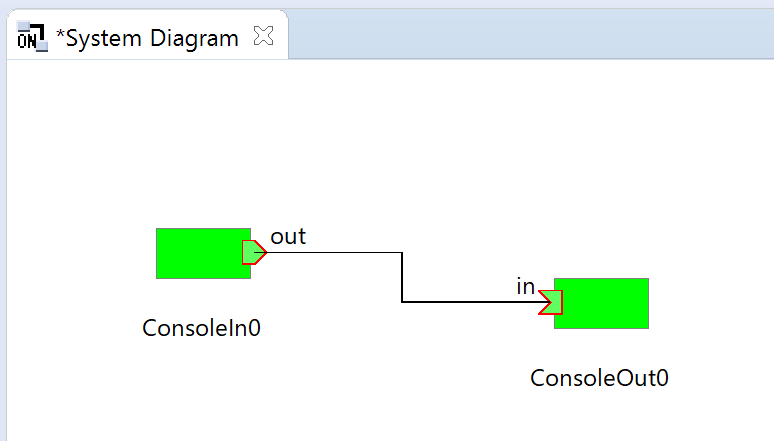
A connecting line appears between the two components. Next, click the [All Activate] button ![]() in the top menu of the RTSystemEditor to activate these components. When activated, the component turns green.
in the top menu of the RTSystemEditor to activate these components. When activated, the component turns green.
When the component is activated, on the console of the ConsoleIn component
Please input number:
The prompt is displayed. Enter an appropriate number (within the range of short int: 32767 or less) and press the Enter key. Then, on the ConsoleOut side, the entered numerical value is displayed, and you can see that the data has been transferred from the ConsoleIn component to the ConsoleOut component.
This concludes the confirmation of the basic operation of components using OpenRTP.
Other samples
The installer also comes with some sample components. These components can be activated as well, and you can try by connecting and activating ports with RTSystemEditor. Below are a list and a brief description of the included components.
| ConsoleIn.py | Output the numerical value input from the console from OutPort. Connect to ConsoleOut.py to use |
| ConsoleOut.py | component to display the numerical value input to InPort on the console. Connect to ConsoleIn.py to use |
| SeqIn.py | component that outputs random numbers (Short, Long, Float, Double and their sequence types). Connect to SeqOut.py to use |
| SeqOut.py | Displays numerical values (Short, Long, Float, Double and their sequence types) input to InPort. Connect to SeqIn.py to use |
| MyServiceProvider.py | component that provides a service of type MyService. Connect to MyServiceConsumer.py to use |
| MyServiceConsumer.py | component that uses a service of type MyService. Connect to MyServiceProvider.py to use |
| ConfigSample.py | Configuration sample. Sample to understand the behavior of Configuration by changing Configuration from RTSystemEditor |
| TkMobileRobotSimulator.py | A simple simulator for mobile robots. Receives the speed of the robot with InPort and outputs the moved position from OutPort |
Operation Check (On Linux)
- /usr/share/openrtm-1.2/components/python/<sample component set name>
- OpenRTM_aist/examples/<sample component set name>
Check that OpenRTM-aist is built and installed correctly using the sample component set SimpleIO.
Sample component set SimpleIO
This is a sample set consisting of RT components ConsoleIn and ConsoleOut. ConsoleIn is a component that outputs numerical values input from the console to OutPort, and ConsoleOut is a component that displays numerical values input from InPort to the console. These are RTC samples to show a simple I/O (input/output) use. It works by connecting the data ports from ConsoleIn's OutPort to ConsoleOut's InPort and activating these two components.
Here, I will explain by assuming that the sample set is under /usr/share/openrtm-1.2/components/python/SimpleIO. Also, it is assumed that a search path has been set for the executable file of Python itself. If you build from the source code, the sample executable file is in <source_dir>/OpenRTM_aist/examples/SimpleIO/, so replace the sample file location in the further explanation and the explanation in the linked page.
Operation check using sample component set
Operation check using RTSystemEditor
In the following explanation, an operation check using RTSystemEditor (OpenRTP) is explained. Please refer to Operation check (On Linux) under the "Install rtshell" page. for the environment that does not use OpenRTP like the case of Raspbian.
Start the name server Follow the procedure below to start RTSystemEditor and the name server.
Launch ConsoleIn
- Open Terminal and launch ConsoleIn.
$ python /usr/share/openrtm-1.2/components/python/SimpleIO/ConsoleIn.py
- If you build and install it yourself,
$ python <source_dir>/OpenRTM_aist/examples/SimpleIO/ConsoleIn.py
Launch ConsoleOut
- Open another Terminal and launch ConsoleOut.
$ python /usr/share/openrtm-1.2/components/python/SimpleIO/ConsoleOut.py
- If you build and install it yourself, similarly
$ python <source_dir>/OpenRTM_aist/examples/SimpleIO/ConsoleOut.py
Placement in System Diagram
- Click [>] in the tree view of RTSystemEditor, and you can see that the two components started in the above. ConsoleIn and ConsoleOut components
- Open System Diagram to edit system. Click the [Open New System Editor] button
 to open the System Diagram in the center pane.
 - Drag and drop the components (two) indicated by the icon
 into the center System Diagram. Place components on System Diagram
Connect and activate
- You can see an OutPort
 where data is output to and is shown on the right side of the ConsoleIn0 component and an InPort
  where data is input from and is shown on the left side of the ConsoleOut0 component like the following figure. Data port connection
- Connect these InPort/OutPort (these are called "data port"). If you drag and drop from the OutPort to the InPort (or from the InPort to the OutPort), a dialog as shown below appears. Click the [OK] button with the default settings. OutPort
 Data port connection dialog
- A connection line appears between the two components. Next, click the [All Activate] button & ref(rtm14.png); in the top menu of the editor to activate these components.
- When activated, the component turns green. Activated component
- When the component is activated, on the console of the ConsoleIn component The prompt is displayed. Enter an appropriate number (within the range of short int: 32767 or less) and press the Enter key. Then, the entered value is also displayed on the ConsoleOut side, and you can see that the data was transferred from the ConsoleIn component to the ConsoleOut component.
Please input number:
This concludes the confirmation of the basic operation of the OpenRTM-aist-python using RTSystemEditor.
Build from the source code (On Windows)
If you want to install from source package on Windows, you need to build OpenRTM-aist-Python yourself.
Build environment
The following tools are required:- Python
- omniORBpy
- Doxgen
Install it as described in the following.
Python
Requires Python 2.7 (or 3.6, 3.7). Please get the latest one from the following site and install it.
In the following explanation, the following settings are required when installing Python. (Others are the default settings of the installer.)
- Set the installation destination to C: \ PythonX.Y.
- X.Y is 2.7, 3.6 or 3.7, eg C:\Python2.7
- In Python3.7, select [Customize Installation] during installation.
- The above directory must be included in the command search path (The path for python directory is added to the environment variable PATH).
- In 3.7, if you check [Add Python to environmental variable] during installation, the installer will set PATH.
- In the other cases, you need to set it manually.
omniORBpy
OpenRTM-aist-Python build requires an omniORBpy library. omniORBpy can obtain the necessary files from the links below.
You can also get the source from the official website.We recommend that you use the latest version of the openrtm.org site file (currently 4.2.3) unless you have a specific reason to do so. There are multiple files, but the meanings of the file names are as follows. Select the file to be used according to the description.
The format of the file name is as follows.
omniORB-X.Y.Z-{win32|x64}-{vc100|vc110|vc120|vc140}-{py27|py36|py37}. zip
here,- X.Y.Z:
- omniORB version, e.g. 4.2.3
- win32
- if 32-bit Python is used.
- x64
- if 64-bit Python is used.
- vc100
- If C ++ environment is used and the tool is Visual Studio 2010
- vc110
- If C ++ environment is used and the tool is Visual Studio 2012
- vc120
- If C ++ environment is used and the tool is Visual Studio 2013
- vc140
- If C ++ environment is used and the tool is Visual Studio 2015/2017/2019
- py27
- If Python 2.7 is used.
- py36
- If Python 3.6 is used.
- py37
- If Python 3.7 is used.
If you use omniORB 4.2.3 in 64bit Python 3.7 environment, download omniORB-4.2.3-x64-vc140-py37.zip.
How to install omniORB files
When the downloaded ZIP file is expanded, the following directory tree is expanded. Copy the files under each directory to the Python directory according to the instructions below.
In the following, I used x.y. for the version of the using omniORBpy and X.Y for the version of the using Python.
 + omniORBpy-x.y
  + bin
     + x86_win32-> Both exe and dll directly under C:\PythonX.Y
  + doc-> may be deleted
  + examples-> may be deleted
  + idl-> may be deleted, but may be deleted under C:\PythonX.Y\Lib\site-packages\omniORB\idl
  + lib
    + python-> The following directories and files as a whole C:\PythonX.Y\Lib\site-packages
    + x86_win32-> .pyd directly under C:\PythonX.Y\Lib\site-packages
Doxygen
Download and execute the Windows version binary executable file from the web page.
Get source package
First, download the source code file OpenRTM-aist-Python-1.2.x.zip from the link below and extract it to an appropriate directory.
Build
Start the command prompt, move to the directory where the source code was extracted earlier, and build with the following command.
> python setup.py build
Install
If everything is Ok for the builds, complete the installation with the following command:
> python setup.py install
This completes the installation of OpenRTM-aist.
Build form the source code (On Linux)
If you want to install from the source package on Linux, you need to build OpenRTM-aist-Python yourself. The following explains the build procedure on Ubuntu 18.04.
Supported OS and distribution
OpenRTM-aist-Python has been confirmed to work on the following OS and Linux distributions.- Ubuntu
- Debian (Supporting versions of OPenRTM-aist are limited)
- Fedora (Supporting versions of OpenRTM-aist are limited )
You may be able to build OpenRTM-aist python on a Linux/UNIX environment other than the above if it is a normal Linux/UNIX environment.
Dependent library
The following development environment and libraries are required to install OpenRTM-aist-Python-1.2.1.- python: required to use build tools
- omniORBpy: Required for OpenRTM-aist build (IDL compilation)
Please install according to the documentation of each software. If these packages are installed under standard directories (/ usr, /usr/lib/, etc.), the subsequent OpenRTM-aist-Python build will be relatively easy.
On Ubuntu and Debian, you can install the software by the following command.
$ sudo apt-get install python-omniorb-omg omniidl-python omniorb-nameserver
Download source
Download the OpenRTM-aist-Python source.Extracting source code
- Unzip the source code package OpenRTM-aist-Python-1.2.1.tar.gz into an appropriate directory.
 $ tar xvzf OpenRTM-aist-Python-X.X.X.tar.gz
 $ cd OpenRTM-aist-Python-X.X.X
Build
OpenRTM-aist-Python uses the distutils module to build packages. Build the package in the same way as other packages using distutils.
$ python setup.py build [options]
Available options in [options] can be found by:
$ python setup.py --help
Install
After the build is completed successfully, install the Python modules and utility commands by the following command:
$ sudo python setup.py install
This completes the build and installation from the source code.

