
package creation using cpack (common settings for windows/linux)
✏️ Edit this page on GitHub#contents(4)
Introduction
CMake has a function for creating installer packages with CPack. RT components generated using OpenRTP 1.2.0 or later can be made into installer packages without changing the CMake settings generated by RTCBuilder. In a Windows environment, you can create an msi-format installer; in a Linux Ubuntu or Debian environment, you can create a deb package; and in a Fedora environment, you can create an rpm package.
(Note) However, with OpenRTP 1.2.0, packages can be created only for C++ or Python RTCs, and Java RTCs are not supported.
Installation of OpenRTP 1.2.0 is introduced on the download page for OpenRTM-aist 1.2.0.
Preparation
Install the software required for creating installers and packages.
Windows Environment
In addition to the software shown when installing OpenRTM-aist, the following software must be installed.
| WiX Toolset | Required to create msi installers. |
| Graphviz | Allows flowcharts, system diagrams, and similar diagrams to be included in documentation. |
Installing WiX Toolset
- Start the installer and click the [install] button to begin installation.
#ref(WiX Toolset 1-1.png,70%,center) - When “Complete” is displayed on the [install] button, installation is complete. Click the [Exit] button.
#ref(WiX Toolset 2-1.png,80%,center)
Installing Graphviz
- Start the installer and click the [Next] button.
#ref(Graphviz 1-1.png,60%,center) - Change the installation folder as desired, and click the [Next] button.
#ref(Graphviz 2-1.png,60%,center) - Click the [Next] button to start installation.
#ref(Graphviz 3-1.png,60%,center)
#ref(Graphviz 4-1.png,60%,center) - After installation is complete, click the [Close] button.
#ref(Graphviz 5-1.png,60%,center) - When installing from the msi, the path is not set automatically, so you need to add the path to the environment variables manually. Right-click Command Prompt and select [Run as administrator].
- Enter and execute the following command in Command Prompt.
>setx /M PATH “%PATH%;[installation folder path]”
#ref(Graphviz 6-1.png,80%,center)
If it succeeds, “SUCCESS: Specified value was saved.” will be displayed. - Close Command Prompt once, and then open it again.
- To confirm that each Graphviz command can be used, enter the following command.
>dot -V #ref(Graphviz 7-1.png,80%,center)
If the version is displayed, setup is complete.
Linux Environment
The packages required can be installed using the script used when installing OpenRTM-aist.
| pkg_install_ubuntu.sh pkg_install_debian.sh pkg_install_fedora.sh pkg_install_raspbian.sh |
$ sudo sh pkg_install_***.sh -l c++ -l python -c --yes |
|---|
Batch Installation
For Ubuntu, Debian, Fedora, and Raspbian, see the batch installation procedure here.
Common Settings for Windows/Linux
Installer Package Name
For Windows, the package name consists of “RTC project name + RTC version number_OpenRTM-aist version number_architecture”.
The version number uses a format with dots removed; [1.0.0] becomes [100].
For Linux, it consists of “RTC project name_RTC version number_architecture”.
Example: package names when a package is created with the following settings
- Project name: RobotController
- Version number: 1.0.0
-
OpenRTM-aist version: 1.2.0
- For Windows
- 32-bit: RobotController100_rtm120_win32.msi
- 64-bit: RobotController100_rtm120_win64.msi
- For Ubuntu and Debian
- 32-bit: robotcontroller_1.0.0_i386.deb
- 64-bit: robotcontroller_1.0.0_amd64.deb
- For Fedora
- 32-bit: RobotController-1.0.0-i686.rpm
- 64-bit: RobotController-1.0.0-x86_64.rpm
The “RTC version number” is the value specified on the “Basic” tab in RTCBuilder.
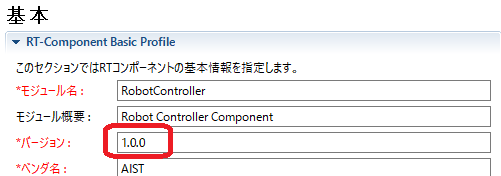
Specifying the Installation Destination Directory
The location where the created installer package is installed when executed is, by default, the OpenRTM-aist installation destination. Only in the Windows environment can the installation destination be changed as desired on the GUI screen when installing OpenRTM-aist.
The default installation destination path is determined by the following conditions.
- The path of OpenRTM-aist installed in the environment where the installer package was created
- RTC language
- The module category specified on the Basic tab when generating the RTC (default: Category)
Any string can be entered for the module category.
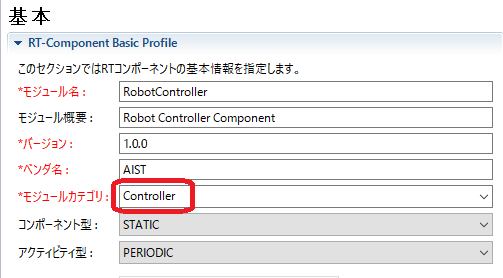
If this RTC is “C++” and the installer is created in an environment where the 32-bit version of OpenRTM-aist 1.2.0 is installed on Windows, the default installation destination is as follows.
C:\Program Files (x86)\OpenRTM-aist\1.2.0\Components\C++\Category\RobotController
If a package is created in a Linux environment, the installation destination is as follows. This example uses “Controller” as the module category.
/usr/share/openrtm-1.2/components/c++/Controller/RobotController
Package Maintainer Information
The package maintainer information reflects the content entered in “Author / Contact” on the “Documentation Generation” tab in RTCBuilder.
The format must be entered as “name
#ref(Maintener 1-1.png,80%,center)