Install OpenRTM-aist 1.1 for Java
Packages and installers for the Java edition of OpenRTM-aist are provided for many operating systems and distributions to allow easy installation. OpenRTM-aist-Java can also be installed by downloading and compiling the source directly.
The following pages describe installing the Java edition of OpenRTM-aist in various environments.
Installation on Windows
(G)openrtm.org offers msi (Microsoft Windows Installer) package for Windows. Tools such as RTSystemEditor can also be installed at the same time by using the msi package.
Installation by msi package
Download msi package from openrtm.org download site. The msi package contains the necessary tools such as RTSystemEditor, but you need to install the JDK in advance.
From version 1.1.2, all 3 languages (C++, Java, Python) + tools (Eclipse + rtshell) are bundled with one Windows installer. We recommend that you uninstall the older version in advance. Also, please read the notation of deficit notation in download site.
(G)Installing the JDK
JDK 8 is recommended for OpenRTM-aist-Java-1.1.2 operation.
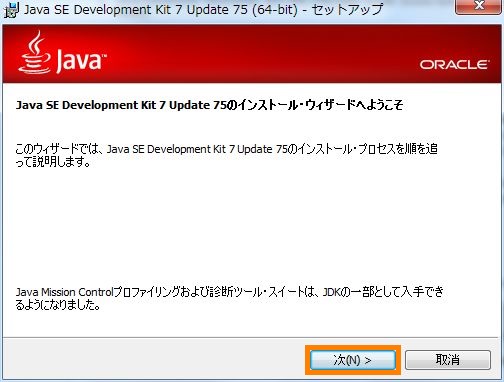
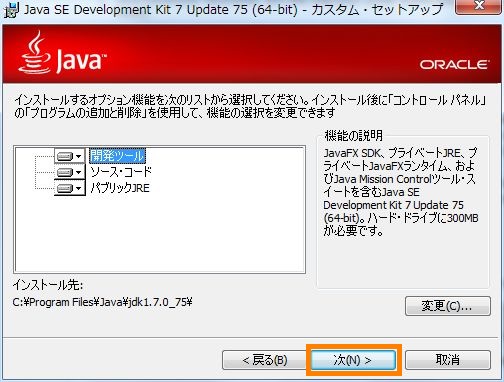
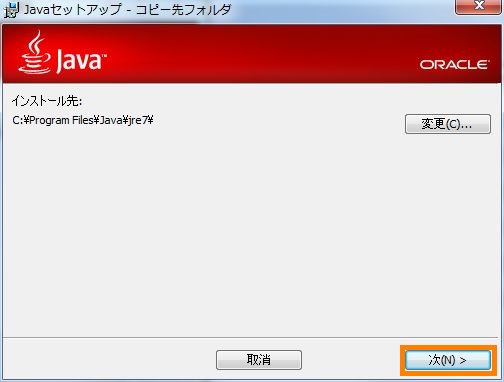
When you download the downloaded file, the installation will start. On the way, you will be asked for permission and installation location, so please set according to your environment. The following installation explanation images are those of JDK 7.
Click the [Next] button.
Click the [Next] button.
Click the [Next] button.
Click the [Close] button.
(G)JDK installation confirmation
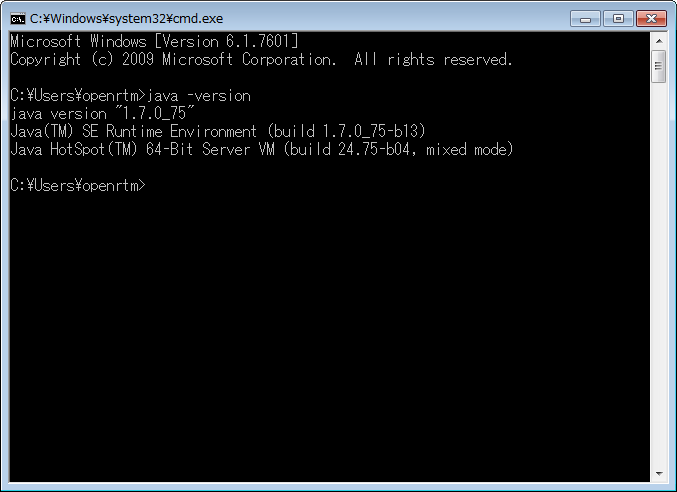
Display the command prompt window ( [Start] > [Programs] > [Accessories] > [Command Prompt] )
> java - version
Enter. Once installed Java version is displayed, installation is completed.
(G)Starting the OpenRTM-aist installer
For the procedure, OpenRTM-aist in 10 minutes! page.
(G) Installation details
(G) Work contents of installer
The installer performs the following tasks.
- Copy various files to the installation directory (default is C:\ Program Files)
- Start Menu Create an OpenRTM-aist folder below and set various shortcuts
- Setting environment variables
- Setting when using msi for 32 bit
 RTM_BASE=C:\Program Files (x86)\OpenRTM-aist\
 RTM_ROOT=C:\Program Files (x86)\OpenRTM-aist\1.1.2\
 RTM_VC_VERSION=vc12
 RTM_JAVA_ROOT=C:\Program Files (x86)\OpenRTM-aist\1.1.2\
 OMNI_ROOT=C:\Program Files (x86)\OpenRTM-aist\1.1.2\omniORB\4.2.1_vc12\
 OpenCV_DIR=C:\Program Files (x86)\OpenRTM-aist\1.1.2\OpenCV2.4.11\
 OpenRTM_DIR=C:\Program Files (x86)\OpenRTM-aist\1.1.2\cmake\
- Additional setting to PATH
- Setting when using msi for 32 bit
 C:\Program Files (x86)\OpenRTM-aist\1.1.2\bin\vc12\
 C:\Program Files (x86)\OpenRTM-aist\1.1.2\omniORB\4.2.1_vc12\bin\x86_win32\
 C:\Program Files (x86)\OpenRTM-aist\1.1.2\OpenCV2.4.11\x86\vc12\bin\
We provide a script to check the setting of the installation environment. We will explain how to use the script and what you can check on the following page.
(G) Files to be installed
The file is installed with the following structure. & br; If you execute script to check the setting of the above installation environment, the OpenRTM-aist directory structure by the tree command is saved in the log file, so you can check the details .
 <install_dir>
   + OpenRTM-aist
      + 1.x.x  :Old version runtime
      + <version>
         + bin: dll, lib, Various commands
         + cmake: OpenRTMConfig.cmake
         + coil: coil header file
         + Components
            + CXX:
               + Examples: C++ Sample component
               + OpenCV: OpenCV のC++ Sample component
            + Java: Java Sample component
            + Python: Python Sample component
         + etc: rtc.conf sample
         + ext: ComponentObserverConsumer
         + jar: OpenRTM-aist And necessary jar files
         + jre: OpenJDK JRE
         + omniORB
         + OpenCV
         + rtm: OpenRTM-aist header file
            + idl: OpenRTM-aist IDL file
         + util
            + OpenRTP:
            + RTSystemEditor:
            + rtc-template:
Installation on Linux
Installation of OpenRTM-aist-Java
Operating condition
OpenJDK 7 or oracleJDK 7
Installation overview
The install process has three steps:
Java commands such as -java, javac will work → Java installation- OpenRTM-aist-Java is expanded / deployed (location is optional) → OpenRTM-aist-Java installation
- Environment variable RTM_JAVA_ROOT is set → Set environment variable
Install Java
OpenRTM - aist - Java runs on JDK 7. For JDK for oracle target platform please refer to the following site etc.Execute the installer
Refer to the JDK installation hints for tips on installing Java on various distributions. The Java installer must be executed as a superuser.
※ When installing Java on Fedora Core, be aware of the following issues:
→ ''FAQ:'' Installing Java on Fedora Core
→ ''FAQ:'' Q. An error appears in RTSystemEditor NameService View on Fedora Core
Test the installation
In a terminal, execute this command to test Java. If the Java version is displayed, the installation is complete.
$ java -version
 java version "1.7.0_75"
 OpenJDK Runtime Environment (IcedTea 2.5.4) (7u75-2.5.4-1~trusty1)
 OpenJDK Client VM (build 24.75-b04, mixed mode, sharing)
Download and extract the zip file
Download the jar file and samples from here. Extract the zip file into a suitable location. The extracted location does not matter, but do not change the directory structure*. The "jar" directory in the extracted location must be added to the RTM_JAVA_ROOT environment variable.
- If you wish to change the directory structure of the extracted files, refer here.
Setting environment variables
The environment variables should be changed in a file appropriate to your shell. For example, users of the bash shell should edit ".bashrc" in their home directory, while users of the csh shell should edit ".cshrc" in their home directory. If you wish to change the variable system-wide, edit the files in /etc/profile. Note that changing the variables for an individual user or system wide will affect how the GUI tools such as Eclipse should be started. See here for more information.
- Variable:RTM_JAVA_ROOT
- Value: Directory extracted from the zip file containing the "jar" directory. The "jar" directory contains the class library file (OpenRTM-aist-X.X.X.jar) and commons-cli-1.1.jar, and should be below a directory called "OpenRTM-aist\<version>". Be sure to include "OpenRTM-aist\<version>" in RTM_JAVA_ROOT.
For example, if the bash shell is in use and OpenRTM-aist-Java has been extracted to /usr/lib, the following line can be appended to .bashrc:
export RTM_JAVA_ROOT=/usr/lib/OpenRTM-aist/<version>
To make this change active in the current shell, execute:
source ~/.bashrc
or open a new shell.
Zip file contents
 +--<install_dir>
     +--OpenRTM-aist
        +--<version>
           +--jar
           +--examples
           +--JavaDoc
           +--JavaDocEn
jar
OpenRTM-aist-Java jar file and other necessary jar files.
- jar/OpenRTM-aist-X.X.X.jar (X.X.Xはバージョン)
- jar/commons-cli-1.1.jar
- jar/rtcd.jar
- jar/rtcprof.jar
examples
Sample class files and shell scripts to launch them.
- Sample class files
 examples/RTMExamples/SeqIO/SeqIn.class
 examples/RTMExamples/SeqIO/view/SeqView.class
 examples/RTMExamples/SeqIO/view/RootPane.class
 examples/RTMExamples/SeqIO/view/SeqViewApp.class
 ...
- Sample execution shell scripts
 examples/AutoTestIn.sh
 examples/AutoTestOut.sh
 examples/Composite.sh
 examples/ConfigSample.sh
 examples/Connector.sh
 examples/ConsoleIn.sh
 examples/ConsoleOut.sh
 examples/ExtConnector.sh
 examples/ExtConsoleIn.sh
 examples/ExtConsoleOut.sh
 examples/GUIIn.sh
 examples/MyServiceConsumer.sh
 examples/MyServiceProvider.sh
 examples/SeqIn.sh
 examples/SeqOut.sh
 examples/SinCosOut.sh
 examples/rtcd_java.sh
 examples/start-orbd.sh
- Sample source code
 examples/RTMExamples/SeqIO/SeqInImpl.java
 examples/RTMExamples/SeqIO/SeqOut.java
 examples/RTMExamples/SeqIO/view/RootPane.java
 examples/RTMExamples/SeqIO/view/SeqView.java
 ...
JavaDoc
Contains the class reference as Javadoc HTML (Japanese).
JavaDocEn
Contains the class reference as Javadoc HTML (English).
Let's proceed to the confirmation so far operation check (Linux version).
Building from source
For uses who require more flexibility, or wish to alter and use the source, OpenRTM-aist-Java can be installed from source.
Building a source distribution
OpenRTM-aist-Java provides a build environment for Eclipse.
Dependencies
Building OpenRTM-aist-Java requires the following libraries.
- Eclipse SDK 3.3.x or greater.
- jdk1.7.0_xx or greater.
Install these dependencies according to their individual documentations. Installing them into standard locations such as /usr and /usr/local will make compiling OpenRTM-aist-Python easier.
Download the source
Download the OpenRTM-aist-Java source from here.
Extract the source code
Extract the OpenRTM-aist-Java.X.X.X.tar.gz file into a suitable location.
- For Linux:
$ tar xvzf OpenRTM-aist-Java-X.X.X.tar.gz
- For Windows, expand it using a tool that can expand tgz.
Build
The diagrams in this section show Windows and Eclipse 3.4.2.
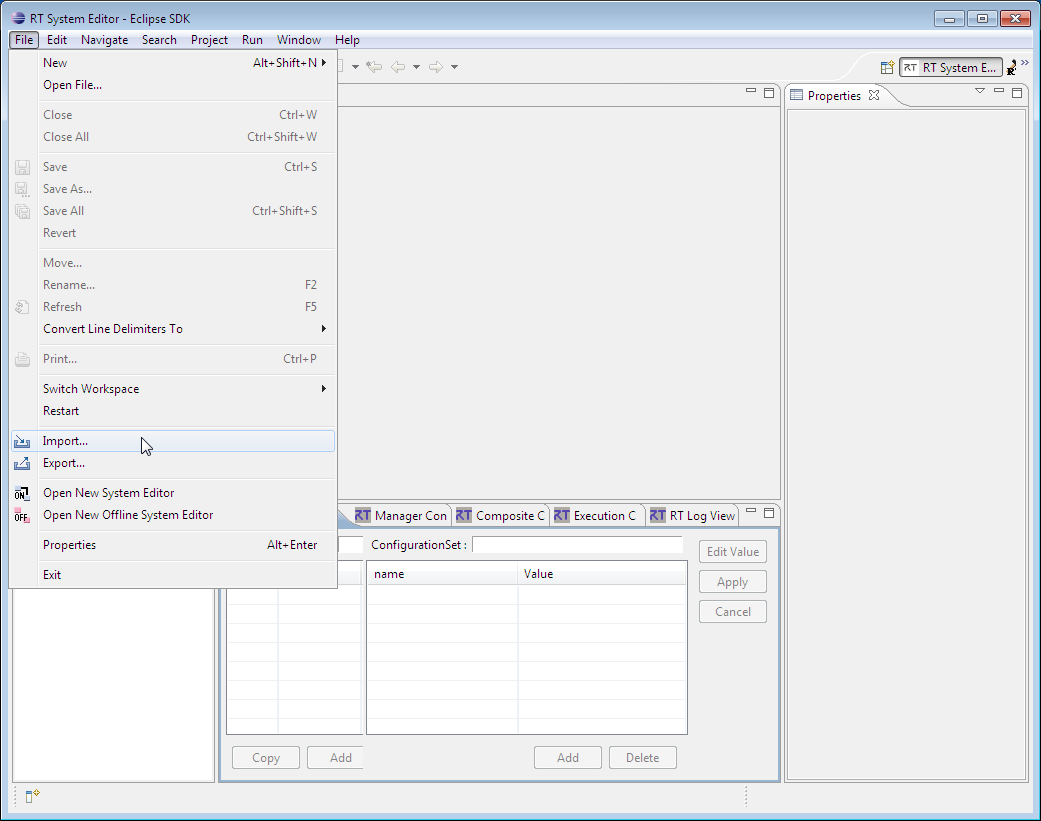
Start Eclipse and import the project into the workspace by selecting "Import" from the File menu.
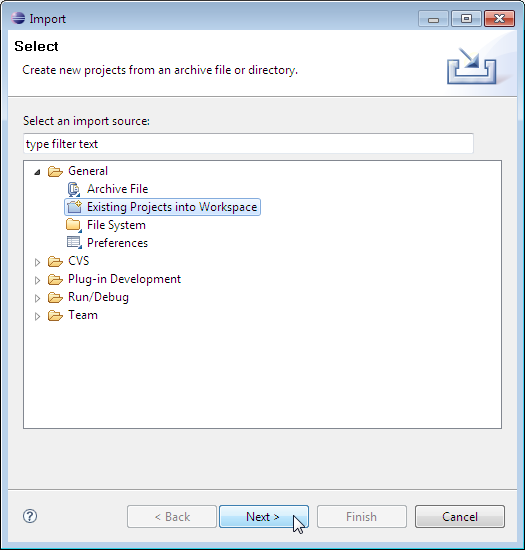
Select "Import an existing project" and click "Next."
Select the folder with the extract files and click "Finish."
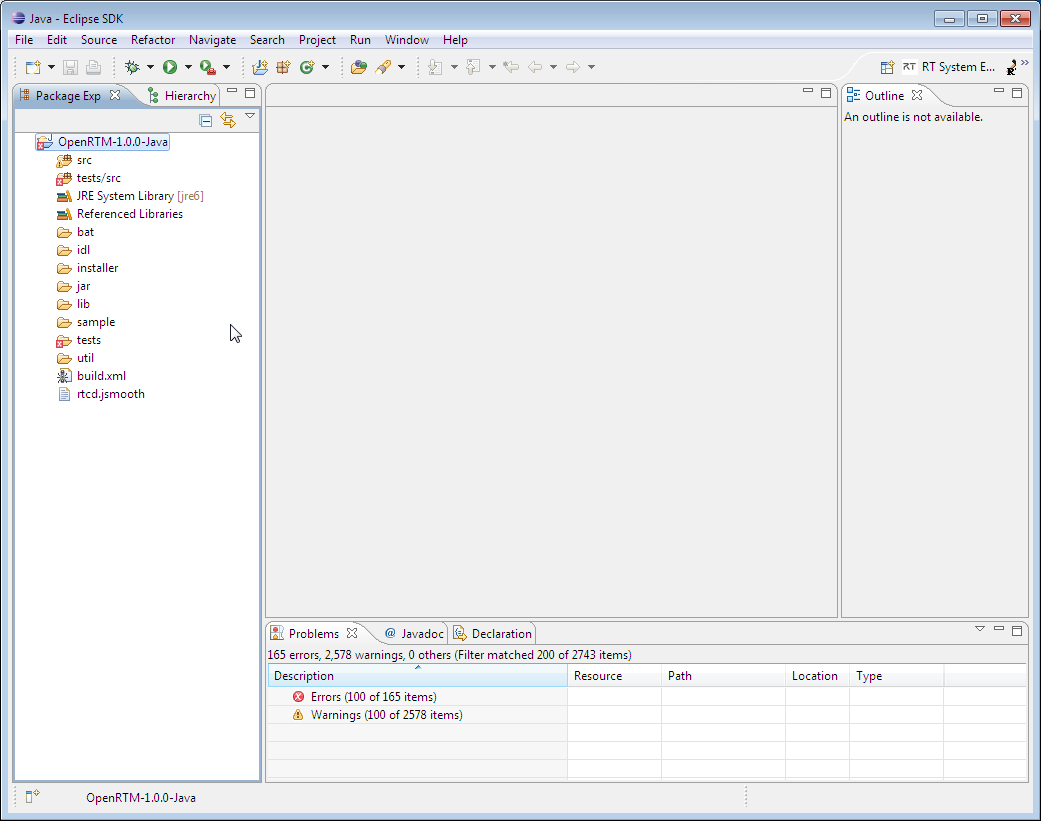
This will import the project into the current workspace.
Right click the build.xml file in the package explorer and select "Ant build" from the "Debug" menu.
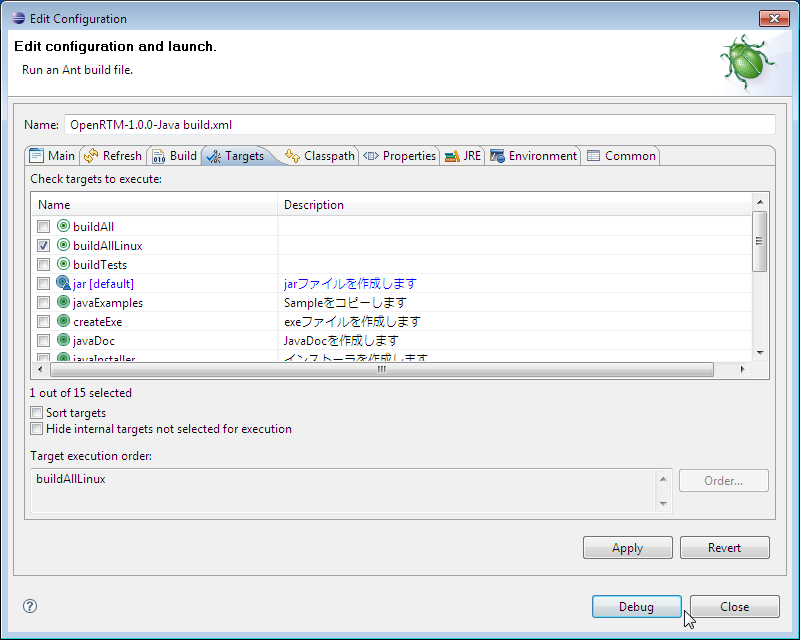
From the displayed window, select "buildAllLinux" and click the "Debug" button.
The build will begin.
If the console window displays the above result, the build has completed.
Buidling from the repository
The OpenRTM-aist-Python source code is stored in a publicly-available Subversion repository. This source code can be checked out and built.
Necessary tools
Subclipse is required to access the repository in Eclipse. You need ant4eclipse at the first build. ant4eclipse: Eclipse plugin (http://ant4eclipse.sourceforge.net)In addition to this in Windows,
Python and PyYAML are required. Download page of OpenRTM-aist C++ version, Please set environment variable. Add to PATH C:\Python27 etc.
JSmooth is required. Please install and set environment variable JSMOOTH_HOME.JSMOOTH_HOME=C:\Program Files (x86)\JSmooth0.9.9-7
Check out the source
The diagrams in this section show Windows and Eclipse 3.4.2.
Check out the source in Eclipse and import it into the workspace. The Import Selection window opens in File > Import. Select [Others] > [Check out project from SVN] and click the [Next] button to open the "Check out from SVN" window. Select "Generate new repository location" and click "Import project" Click the "Next" button. In 'Url' enter http://svn.openrtm.org/OpenRTM-aist-Java/trunk/ and click the Next button. The "Select Folder" window opens, so select "jp.go.aist.rtm.RTC" and click the "Finish" button.
Download the script file or batch file from the first time only ( http://svn.openrtm.org/OpenRTM-aist-Java/trunk/ ) and execute it.
These files Subclipse can not check out.
The required java source file is generated from the idl file.
There is an incompleteness in the current trunk, an error occurs in part of the TEST file etc. In addition, msi file is not generated on Windows.
Build
The diagrams in this section show Windows and Eclipse 3.4.2.
Right click the build.xml file in the package explorer and select "Ant build" from the "Debug" menu.
From the displayed window, select "buildAllLinux" and click the "Debug" button.
The build will begin.
If the console window displays the above result, the build has completed.
Testing operation in Windows
Once the install has completed successfully, OpenRTM-aist-Java can be tested using the included sample components. These are typically stored in one of the following locations:
- The start menu: [Start] > [OpenRTM-aist] > [Java] > [components] > [examples]
- C:\Program Files\OpenRTM-aist\<version>\examples\Java
- OpenRTM-<version>-Java/installer/resources/Source/examples (When building from source.)
We will use the SimpleIO components to check that OpenRTM-aist has built and installed correctly.
SimpleIO sample component set
This set contains the ConsoleInComp and ConsoleOutComp components. ConsoleInComp receives numbers as input from the console and sends them over an OutPort. ConsoleOutComp receives numbers via an InPort and prints them to the console. They use this very simple I/O to illustrate the basics of RT Components. Connect the OutPort of ConsoleInComp to the InPort of ConsoleOutComp and activate them.
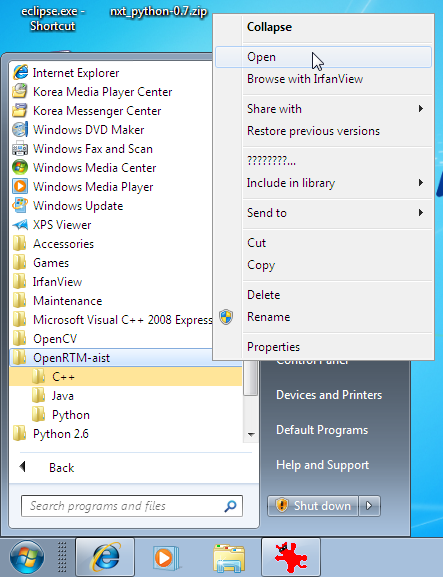
The explanation below assumes OpenRTM-aist-Java has been installed using the MSI package and the sample components are available in the Start Menu. Right-clicking on the OpenRTM-aist entry in the Start Menu and selecting "Open" will make accessing these more convenient.
Start the name server
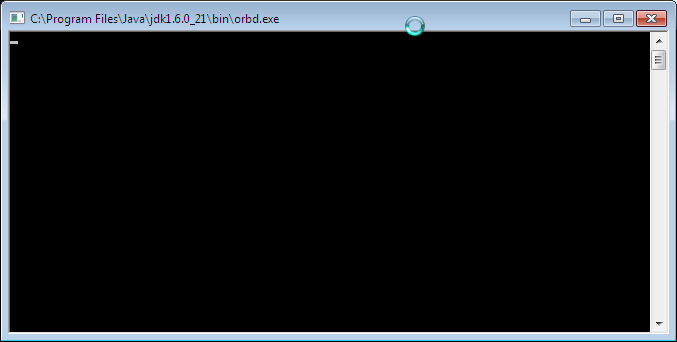
First, a name server that the components can register on must be started. Start it using the shortcut in the Start Menu at [OpenRTM-aist 1.1] > [Tools] > Start Naming Service.
A console like the following will open.
When the console doesn't open
There are cases where the name server console screen does not open. In this case, there are several causes as below, so investigate the cause and take appropriate action.
"Start Java Naming Service" starts the name server (omniNames.exe) from the batch file in %RTM_ROOT%\bin\rtm-naming.bat. At this time, we use the environment variable OMNI_NAMES to refer to omniNames.exe. When installing OpenRTM-aist normally with the installer, the OMNI_ROOT environment variable is set automatically, but if the environment variable is invalid for some reason or you install it manually, the environment variable is set There is no thing.
Start the sample components
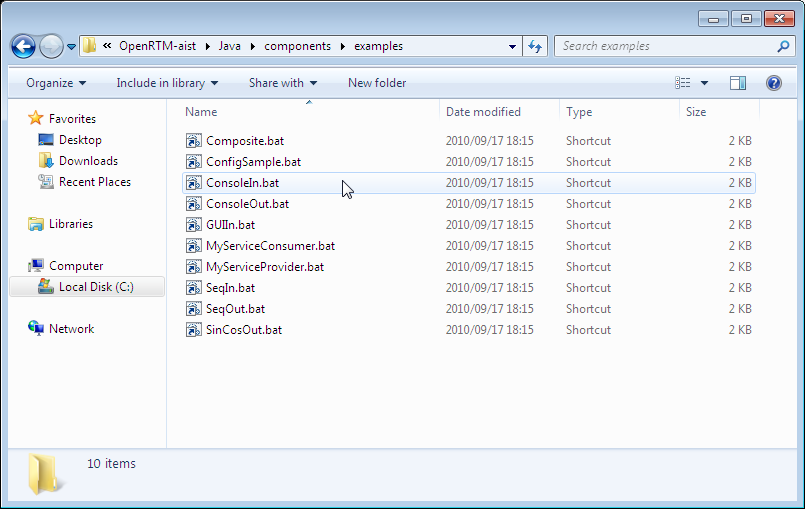
After activating the name server, start the appropriate sample component. When you open [OpenRTM-aist1.1] > [Java] > [Components] > [Examples] in the start menu folder opened earlier, there are several components as shown in the figure.
Start ConsoleIn.py and ConsoleOut.py, causing two consoles to open.
When the components don't start
Sometimes the component consoles do not open. There are several possible causes for this, described below.
The console opens and immediately closes
There may be an error in the rtc.conf file, preventing the components from starting. Confirm the contents of the rtc.conf file "rtc.conf for examples" in the Start Menu. For example, the corba.endpoint/corba.endpoints settings should match the host address of the current computer.
Try creating a minimal rtc.conf, as below.
corba.nameservers: localhost
The components terminate with a runtime error
A line time error may appear due to reasons such as libraries not being properly installed or not being set.- Try rebooting
- OpenRTM-aist It may be improved by uninstalling and reinstalling all of them.
Start RTSystemEditor (RTSE)
RTSystemEditor can be started from the Start Menu Folder: [OpenRTM-aist 1.1] > [Tools] > [RTSystemEditor].
Browsing the name server
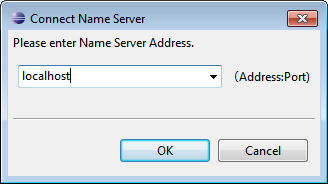
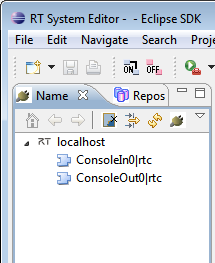
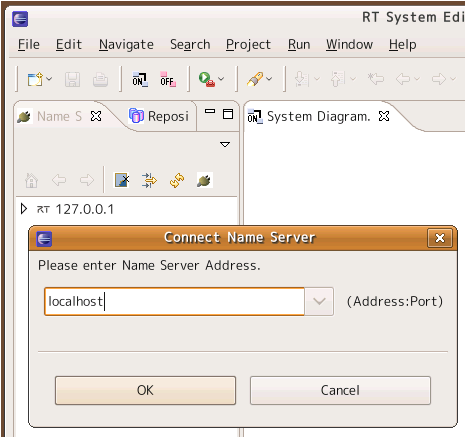
Connect to the name server and browse the registered components. You can connect to a name server using the Name Service View on the left side of RTSystemEditor. Click the plug icon to connect to a name server and enter its address (localhost or localhost:2809) in the dialog box. The default port for omniNames and orbd is 2809.
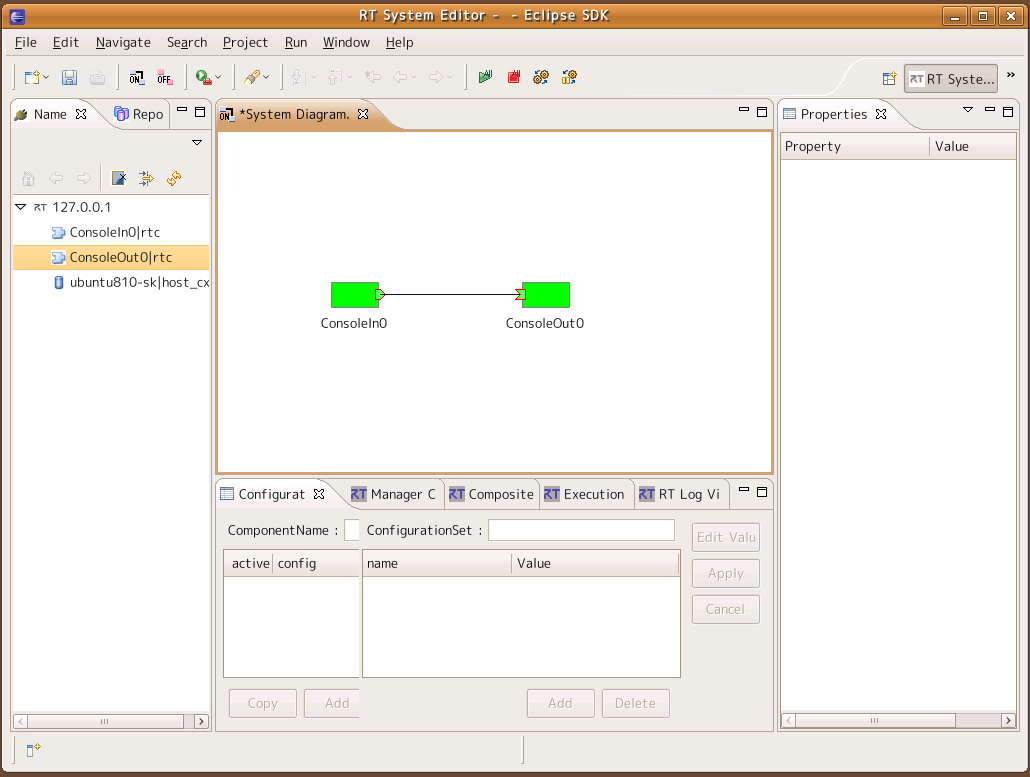
The name server running on localhost will appear in the Name Service View. Open the tree branches by clicking the arrows to find the two components you started.
Adding components to the system
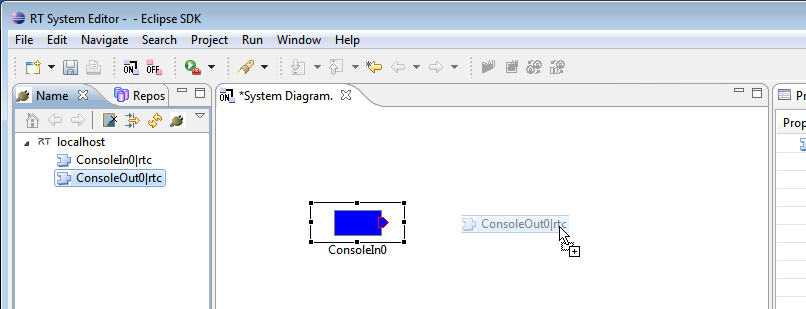
Open a system editor using the new system editor button in the toolbar ![]() . The editor will open in the central pane. Drag the components
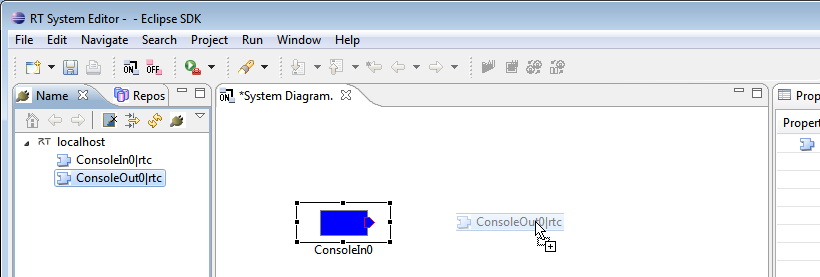
. The editor will open in the central pane. Drag the components ![]() from the name service view into the editor.
from the name service view into the editor.
Connecting and activating
The OutPort of ConsoleIn0 is displayed on its right-hand side ![]() . Drag from this to the InPort on the ConsoleOut0 component
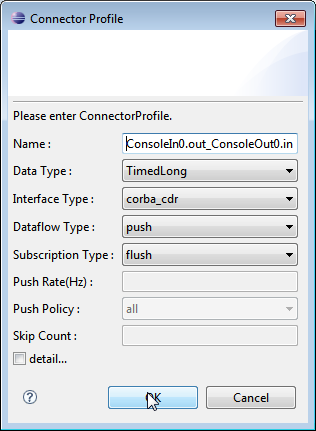
. Drag from this to the InPort on the ConsoleOut0 component ![]() to connect these data ports. The connection dialog will be displayed. Click "OK" to accept the defaults and connect the components.
to connect these data ports. The connection dialog will be displayed. Click "OK" to accept the defaults and connect the components.
A line indicating the connection will appear between the two ports. Next, click the "Activate All" button ![]() in the toolbar. This will activate all components in the editor at once. Active components will appear green.
in the toolbar. This will activate all components in the editor at once. Active components will appear green.
After connecting the ports of ConsoleInComp and ConsoleOutComp, the terminal for ConsoleInComp will display:
Please input number:
Enter a number and press enter. This number should fit within a short int. Look at the ConsoleOutComp terminal. The number you entered should have been printed out. If this is the case, OpenRTM-aist-Java is functioning correctly.
Other samples
Other sample components are included in the installed OpenRTM-aist-Java. They can all be used in the same way as the above example.
| ConsoleInComp.bat | Receive numbers from the console and send them over an OutPort. Connect it to ConsoleOutComp.exe to use. |
| ConsoleOutComp.bat | Receive numbers over an InPort and print them in a console. Connect it to ConsoleInComp.exe to use. |
| SequenceInComp.bat | A component to output various simple data types (short, long, float, double, and sequences). Connect it to SequenceOutComp.exe to use. |
| SequenceOutComp.bat | Display various simple data types received over an InPort. Connect it to SequenceInComp.exe to use. |
| MyServiceProviderComp.bat | Provides a simple service, MyService. Connect it to MyServiceConsumerComp.exe to use. |
| MyServiceConsumerComp.bat | Consumes a simple service, MyService. Connect it to MyServiceProviderComp.exe to use. |
| ConfigSampleComp.bat | Sample demonstrating configuration parameters. Modify the configuration parameters in RTSystemEditor or with rtconf to see the effect. |
Testing operation in Linux
Once the install has completed successfully, OpenRTM-aist-Java can be tested using the included sample components. These are typically stored in the following location:
- /OpenRTM-aist/<version>/examples
If you built from source, they can also be found in the source directory:
- /OpenRTM-X.X.X-Java/installer/resources/Source/examples
We will use the SimpleIO components to check that OpenRTM-aist-Java has built and installed correctly.
SimpleIO sample component set
This set contains the ConsoleInComp and ConsoleOutComp components. ConsoleInComp receives numbers as input from the console and sends them over an OutPort. ConsoleOutComp receives numbers via an InPort and prints them to the console. They use this very simple I/O to illustrate the basics of RT Components. Connect the OutPort of ConsoleInComp to the InPort of ConsoleOutComp and activate them.
The explanation below assumes the sample components are in /usr/share/OpenRTM-aist/examples/python.
Test using the sample components
Start the name server
First, a name server that the components can register on must be started. OpenRTM-aist-Java provides a shell script to start orbd, the Java CORBA naming service. If omniORB was installed as a package in Linux, it will often add the name server as a system service. This can be used instead of orbd. You can check if this is the case on your system using the ps command:
 $ ps ax | grep omni
 1550  ?        Sl     0:00 /usr/bin/omniNames -errlog /var/log/omniorb4-nameserver.log
 18418 pts/2    S+     0:00 grep --color=auto omni
If omniNames is not executing, the command will produce something like this (or no output at all):
 $ ps ax | grep omni
 18418 pts/2    S+     0:00 grep --color=auto omni
To start omniNames manually, use the start-orbd.sh command (found in OpenRTM-aist/1.0/examples):
 $ sh /home/openrtm/OpenRTM-aist/1.0/examples/start-orbd.sh
 Starting Java CORBA naming service (orbd).
orbd is a blocking program, not a daemon.
If IPv6 is configured on the system, the host name localhost may not function properly. In that case, replace localhost with 127.0.0.1.
Start ConsoleInComp
Open a new terminal and start ConsoleInComp.
 $ sh /home/openrtm/OpenRTM-aist/1.0/examples/ConsoleInComp

 Creating a component: "ConsoleIn"....
 succeed.
 =================================================
  Component Profile
 -------------------------------------------------
 InstanceID:     ConsoleIn0
 Implementation: ConsoleIn
 Description:    Console input component
 Version:        1.0
 Maker:          Noriaki Ando, AIST
 Category:       example
   Other properties
 =================================================
 =================================================
 Port0 (name):
 ConsoleIn0.out
 -------------------------------------------------
 - properties -
 port.port_type:DataOutPort
 dataport.data_type:TimedLong
 dataport.subscription_type:new, flush, periodic
 dataport.dataflow_type:push,pull
 dataport.interface_type:corba_cdr
 -------------------------------------------------
Start ConsoleOutComp
In the same way, start ConsoleOutComp.
 $ sh /home/openrtm/OpenRTM-aist/1.0/examples/ConsoleOutComp

 Creating a component: "ConsoleOut"....
 succeed.
 =================================================
  Component Profile
 -------------------------------------------------
 InstanceID:     ConsoleOut0
 Implementation: ConsoleOut
 Description:    Console output component
 Version:        1.0
 Maker:          Noriaki Ando, AIST
 Category:       example
   Other properties
 =================================================
 =================================================
 Port0 (name):
 ConsoleOut0.in
 -------------------------------------------------
 - properties -
 port.port_type:DataInPort
 dataport.data_type:TimedLong
 dataport.subscription_type:Any
 dataport.dataflow_type:push,pull
 dataport.interface_type:corba_cdr
 -------------------------------------------------
Start RTSystemEditor
You can use RTSystemEditor to connect the two components and activate them. Download the all-in-one Eclipse package from here and extract it.
RTSystemEditor requires Java Development Kit 7. Install it according to the instructions below, or use an equivalent such as OpenJDK as provided by your distribution. Refer to this page for details on starting RTSystemEditor.
Browsing the name server
Connect to the name server and browse the registered components. You can connect to a name server using the Name Service View on the left side of RTSystemEditor. Click the plug icon to connect to a name server and enter its address (localhost or localhost:2809) in the dialog box. The default port for omniNames and orbd is 2809.
Drag the RT Components registered on the name server into the system editor. In the name service view, select the ConsoleIn0 and ConsoleOut0 items and drag them into the editor in the middle. Now click and drag between the small boxes at the side of each component, dragging from one component to the other and releasing. The connection dialog will appear. Accept it with all defaults to make a connection between the components.
Click the green "Play" button in the toolbar to activate all components in the system editor.
Confirming data transfer
After connecting the ports of ConsoleInComp and ConsoleOutComp, the terminal for ConsoleInComp will display:
Please input number:
Enter a number and press enter. This number should fit within a short int. Look at the ConsoleOutComp terminal. The number you entered should have been printed out. If this is the case, OpenRTM-aist is functioning correctly.
Tips
JDK installation hints
The JDK installs either OpenJDK or OracleJDK. Here, we will show you how to install in the following environment.Ubuntu 14.04
OpenJDK7
It can be installed with apt-get.
$ sudo apt-get install openjdk-7-jdk
Confirmation of JDK
 $ java -version
 java version "1.7.0_75"
 OpenJDK Runtime Environment (IcedTea 2.5.4) (7u75-2.5.4-1~trusty1)
 OpenJDK 64-Bit Server VM (build 24.75-b04, mixed mode)
Here, when the version is displayed for "1.6.0_xx", change it to use JDK 7. This switching is done with the update-alternatives command.
 $ sudo update-alternatives --config java
 alternative java (provides /usr/bin/java) has 2 choices.
   Option         path                                         priority      status
 -------------------------------------------------------------------------------------
 * 0            /usr/lib/jvm/java-6-openjdk-amd64/jre/bin/java   1061      auto mode
   1            /usr/lib/jvm/java-6-openjdk-amd64/jre/bin/java   1061      manual mode
   2            /usr/lib/jvm/java-7-openjdk-amd64/jre/bin/java   1051      manual mode
 Press Enter to keep the current selection [*], otherwise press the key of the choice: 2
oracleJDK7
Add the repository and install oracleJDK7.
 $ sudo add-apt-repository ppa:webupd8team/java
 $ sudo apt-get update
 $ sudo apt-get install oracle-jdk7-installer
Confirmation of JDK
 $ java -version
 java version "1.7.0_76"
 Java(TM) SE Runtime Environment (build 1.7.0_76-b13)
 Java HotSpot(TM) 64-Bit Server VM (build 24.76-b04, mixed mode)
If you also have OpenJDK installed, you can check the selection status below.
 $ update-alternatives --config java
 alternative java (provides /usr/bin/java) has 2 choices.
      Option         path                                         priority      status
 -------------------------------------------------------------------------------------
 * 0            /usr/lib/jvm/java-7-oracle/jre/bin/java          1072      auto mode
   1            /usr/lib/jvm/java-7-openjdk-amd64/jre/bin/java   1071      manual mode
   2            /usr/lib/jvm/java-7-oracle/jre/bin/java          1072      manual mode
 Press Enter to keep the current selection [*], otherwise press the key of the choice:
Debian 7.0 Wheezy
OpenJDK7
For the procedure, refer to Ubuntu 14.04 above. It can be set by the same procedure.
oracleJDK7 (Method using java-package: corresponding from Debian 7.0)
Follow the instructions on the right to install. https://wiki.debian.org/JavaPackage
Add the following sentence to the end of /etc/apt/sources.list.
deb http://http.debian.net/debian/ wheezy main contrib
Install the required java-package to install the JDK.
 # apt-get update
 # apt-get install java-package
Download the JDK (here jdk-7u75-linux-x64.tar.gz) from the oracle site.
http://www.oracle.com/technetwork/java/javase/downloads/jdk7-downloads-1880260.html
Generate and install the deb package.
 $ make-jpkg jdk-7u75-linux-x64.tar.gz
 $ ls
 oracle-j2sdk1.7_1.7.0+update75_amd64.deb
 # dpkg -i oracle-j2sdk1.7_1.7.0+update75_amd64.deb
Select oracleJDK.
 # update-alternatives --config java
 alternative java (provides /usr/bin/java) has 3 choices.
 Alternative java (provides /usr/bin/java) has 3 choices.
      Option         path                                         priority      status
 -------------------------------------------------------------------------------------
   0            /usr/lib/jvm/java-6-openjdk-amd64/jre/bin/java   1061      auto mode
   1            /usr/lib/jvm/j2sdk1.7-oracle/jre/bin/java        317       manual mode
   2            /usr/lib/jvm/java-6-openjdk-amd64/jre/bin/java   1061      manual mode
 * 3            /usr/lib/jvm/java-7-openjdk-amd64/jre/bin/java   1051      manual mode
 Press Enter to keep the current selection [*], otherwise press the number of the choice: 1
Confirmation of JDK
 $ java -version
 java version "1.7.0_75"
 Java(TM) SE Runtime Environment (build 1.7.0_75-b13)
 Java HotSpot(TM) 64-Bit Server VM (build 24.75-b04, mixed mode)
Debian 6.0 Squeeze
OpenJDK7
Add the wheezy repository to the end of /etc/apt/sources.list.
 # vi /etc/apt/sources.list
 deb http://ftp.jp.debian.org/debian/ wheezy main
Since it was added only for the installation of openjdk 7, the priority is the sqeeze version, so create a local file in / etc / apt / apt.conf.d and write the following.
 # vi /etc/apt/apt.conf.d/local
 APT::Default-Release "squeeze";
On the other hand, the priority of the package included in wheezy is kept to a minimum. In the squeeze environment, we want to avoid having to upgrade major libraries unnecessarily.
Create a wheezy file in /etc/apt/preferences.d and write the following.
 # vi /etc/apt/preferences.d/wheezy
 Package: *
 Pin: release n=wheezy
 Pin-Priority: 10
For priority, 100 is allocated to the package being installed, 500 is allocated to the package not installed, so specify a value smaller than 100.
 # apt-get update
 # apt-get install -t wheezy openjdk-7-jdk
Select OpenJDK 7.
 # update-alternatives --config java
 alternative java (provides /usr/bin/java) has 3 choices.
   Option         path                                         priority      status
 -------------------------------------------------------------------------------------
 * 0            /usr/lib/jvm/java-6-openjdk/jre/bin/java         1061      auto mode
   1            /usr/bin/gij-4.7                                 1047      manual mode
   2            /usr/lib/jvm/java-6-openjdk/jre/bin/java         1061      manual mode
   3            /usr/lib/jvm/java-7-openjdk-amd64/jre/bin/java   1051      manual mode
 Press Enter to keep the current selection [*], otherwise press the number of the choice: 3
Confirmation of JDK
 # java -version
 java version "1.7.0_03"
 OpenJDK Runtime Environment (IcedTea7 2.1.7) (7u3-2.1.7-1)
 OpenJDK 64-Bit Server VM (build 22.0-b10, mixed mode)
oracleJDK 7 (How to install with update-alternatives)
Debian 6.0 does not support java-package, so install it with update-alternatives.
Download the JDK (here jdk-7u75-linux-x64.tar.gz) from the oracle site.
http://www.oracle.com/technetwork/java/javase/downloads/jdk7-downloads-1880260.html
Unzip it and move the generated directory jdk1.7.0_75 to /usr/lib.
 # tar xvzf jdk-7u75-linux-x64.tar.gz
 # mv jdk1.7.0_75 /usr/lib/jvm/jdk1.7.0-oracle
Install with the update-alternatives command. At this time, the priority is specified, but here it is 1.
 # update-alternatives --install "/usr/bin/java" "java" "/usr/lib/jvm/jdk1.7.0-oracle/bin/java" 1
 # update-alternatives --install "/usr/bin/javac" "javac" "/usr/lib/jvm/jdk1.7.0-oracle/bin/javac" 1
Select oracleJDK.
 # update-alternatives --config java
 There are four choices in alternative java (providing /usr/bin/java).
   Option         path                                         priority      status
 -------------------------------------------------------------------------------------
   0            /usr/lib/jvm/java-6-openjdk/jre/bin/java         1061      auto mode
   1            /usr/bin/gij-4.7                                 1047      manual mode
   2            /usr/lib/jvm/java-6-openjdk/jre/bin/java         1061      manual mode
 * 3            /usr/lib/jvm/java-7-openjdk-amd64/jre/bin/java   1051      manual mode
   4            /usr/lib/jvm/jdk1.7.0-oracle/bin/java            1         manual mode
 Press Enter to hold the current selection [*], otherwise press the number of the choice: 4
Confirmation of JDK
 $ java -version
 java version "1.7.0_75"
 Java(TM) SE Runtime Environment (build 1.7.0_75-b13)
 Java HotSpot(TM) 64-Bit Server VM (build 24.75-b04, mixed mode)
Reference site (external site):
Fedora 20
OpenJDK7
It is already installed.
 $ java -version
 java version "1.7.0_75"
 OpenJDK Runtime Environment (fedora-2.5.4.2.fc20-x86_64 u75-b13)
 OpenJDK 64-Bit Server VM (build 24.75-b04, mixed mode)
oracleJDK7
Download the JDK (jdk-7u75-linux-x64.rpm in this case) from the oracle site.
http://www.oracle.com/technetwork/java/javase/downloads/jdk7-downloads-1880260.html
Installation
# rpm -ivh jdk-7u75-linux-x64.rpm
Confirm installation destination
 # ls -l /usr/java/
 lrwxrwxrwx. 1 root root   16  3月 17 10:47 default -> /usr/java/latest
 drwxr-xr-x. 8 root root 4096  3月 17 10:46 jdk1.7.0_75
 lrwxrwxrwx. 1 root root   21  3月 17 10:47 latest -> /usr/java/jdk1.7.0_75
Register oracleJDK to alternatives. At this time, if you use the /usr/java/latest path from the installation above, you can see that it does not depend on the JDK version number.
Before registering, check the Java settings.
 # update-alternatives --display java
 java - The status is manual.
 The link now points to /usr/lib/jvm/java-1.7.0-openjdk-1.7.0.75-2.5.4.2.fc20.x86_64/jre/bin/java.
 /usr/lib/jvm/java-1.7.0-openjdk-1.7.0.75-2.5.4.2.fc20.x86_64/jre/bin/java - Priority item 170075
  Slave keytool: /usr/lib/jvm/java-1.7.0-openjdk-1.7.0.75-2.5.4.2.fc20.x86_64/jre/bin/keytool
  Slave orbd: /usr/lib/jvm/java-1.7.0-openjdk-1.7.0.75-2.5.4.2.fc20.x86_64/jre/bin/orbd
  Slave pack200: /usr/lib/jvm/java-1.7.0-openjdk-1.7.0.75-2.5.4.2.fc20.x86_64/jre/bin/pack200
  Slave rmid: /usr/lib/jvm/java-1.7.0-openjdk-1.7.0.75-2.5.4.2.fc20.x86_64/jre/bin/rmid
  Slave rmiregistry: /usr/lib/jvm/java-1.7.0-openjdk-1.7.0.75-2.5.4.2.fc20.x86_64/jre/bin/rmiregistry
  Slave servertool: /usr/lib/jvm/java-1.7.0-openjdk-1.7.0.75-2.5.4.2.fc20.x86_64/jre/bin/servertool
  Slave tnameserv: /usr/lib/jvm/java-1.7.0-openjdk-1.7.0.75-2.5.4.2.fc20.x86_64/jre/bin/tnameserv
  Slave unpack200: /usr/lib/jvm/java-1.7.0-openjdk-1.7.0.75-2.5.4.2.fc20.x86_64/jre/bin/unpack200
  Slave jre_exports: /usr/lib/jvm-exports/java-1.7.0-openjdk-1.7.0.75-2.5.4.2.fc20.x86_64
  Slave jre: /usr/lib/jvm/java-1.7.0-openjdk-1.7.0.75-2.5.4.2.fc20.x86_64/jre
  Slave java.1.gz: /usr/share/man/man1/java-java-1.7.0-openjdk-1.7.0.75-2.5.4.2.fc20.x86_64.1.gz
  Slave keytool.1.gz: /usr/share/man/man1/keytool-java-1.7.0-openjdk-1.7.0.75-2.5.4.2.fc20.x86_64.1.gz
  Slave orbd.1.gz: /usr/share/man/man1/orbd-java-1.7.0-openjdk-1.7.0.75-2.5.4.2.fc20.x86_64.1.gz
  Slave pack200.1.gz: /usr/share/man/man1/pack200-java-1.7.0-openjdk-1.7.0.75-2.5.4.2.fc20.x86_64.1.gz
  Slave rmid.1.gz: /usr/share/man/man1/rmid-java-1.7.0-openjdk-1.7.0.75-2.5.4.2.fc20.x86_64.1.gz
  Slave rmiregistry.1.gz: /usr/share/man/man1/rmiregistry-java-1.7.0-openjdk-1.7.0.75-2.5.4.2.fc20.x86_64.1.gz
  Slave servertool.1.gz: /usr/share/man/man1/servertool-java-1.7.0-openjdk-1.7.0.75-2.5.4.2.fc20.x86_64.1.gz
  Slave tnameserv.1.gz: /usr/share/man/man1/tnameserv-java-1.7.0-openjdk-1.7.0.75-2.5.4.2.fc20.x86_64.1.gz
  Slave unpack200.1.gz: /usr/share/man/man1/unpack200-java-1.7.0-openjdk-1.7.0.75-2.5.4.2.fc20.x86_64.1.gz
The above result shows that orbd is registered as a slave. When invoking the name server, the path must be passed to orbd. The slave specifies what you want to switch with java installed with update-alternatives - install. Therefore, when registering oracleJDK to alternatives, we also specify with --slave option.
Also, the priority item 170075 is priority. update-alternatives --install Specify the priority when running. Since the version of OpenJDK 7 and orcleJDK 7 is the same this time, we will specify 170075 as the priority when registering oracleJDK 7.
For these reasons, register with the following settings.
 # update-alternatives --install /usr/bin/java java /usr/java/latest/bin/java 170075
   --slave /usr/bin/javac javac /usr/java/latest/bin/javac
   --slave /usr/bin/javaws javaws /usr/java/latest/bin/javaws
   --slave /usr/bin/keytool keytool /usr/java/latest/bin/keytool
   --slave /usr/bin/orbd orbd /usr/java/latest/bin/orbd
   --slave /usr/bin/pack200 pack200 /usr/java/latest/bin/pack200
   --slave /usr/bin/rmid rmid /usr/java/latest/bin/rmid
   --slave /usr/bin/rmiregistry rmiregistry /usr/java/latest/bin/rmiregistry
   --slave /usr/bin/servertool servertool /usr/java/latest/bin/servertool
   --slave /usr/bin/tnameserv tnameserv /usr/java/latest/bin/tnameserv
   --slave /usr/bin/unpack200 unpack200 /usr/java/latest/bin/unpack200
Select oracleJDK.
 # update-alternatives --config java
 There are 2 programs and provide 'java'.
    Selection command
 -----------------------------------------------
 *+ 1           /usr/lib/jvm/java-1.7.0-openjdk-1.7.0.75-2.5.4.2.fc20.x86_64/jre/bin/java
    2           /usr/java/latest/bin/java
 Press Enter to hold the current selection [+] or enter the selection number: 2
Confirmation of JDK
 # java -version
 java version "1.7.0_75"
 Java(TM) SE Runtime Environment (build 1.7.0_75-b13)
 Java HotSpot(TM) 64-Bit Server VM (build 24.75-b04, mixed mode)
