
running sample rt systems
✏️ Edit this page on GitHub#contents
Preparation
Windows
Installing RTCs
The following RTCs are used in some of the sample RT systems. Please install them before proceeding.
DirectInputRTC
This RTC is used to control the robot with a joystick.
Download and run the installer from the following site:
- http://ysuga.net/?p=130
JoystickToVelocity
This RTC converts the output from the DirectInputRTC OutPort (TimedLongSeq type) into the TimedVelocity2D type.
Download and run the installer from the following site:
- http://ysuga.net/?p=130
Starting the Name Server and RT System Editor
Windows
First, start the Name Server and RT System Editor on Windows.
For detailed instructions, refer to the following page:
Raspbian
The downloaded package from the Bulk Installation section contains an rtc.conf file.
Modify the following line by replacing ppp.pp.pp.ppp with the IP address of the Windows machine.
corba.nameservers: ppp.pp.ppp.ppp
This allows the components started on Raspbian to be registered with the Name Server running on Windows.
To check the IP address on Windows, run the following command:
ipconfig
Starting RTCs
Windows
On the Windows side, execute the batch file start_component.bat included in the files downloaded from the Script Files section.
This starts the following RTCs:
DirectInput0
JoystickToVelocity0
RaspberryPiMouseGUI0
TkJoyStick0
Note
- This script is intended for 64-bit Windows with 32-bit OpenRTM-aist.
- For 32-bit Windows, use start_component_32.bat.
- For 64-bit OpenRTM-aist, use start_component_64.bat.
- If the Python installation directory is not included in the system PATH, TkJoyStick cannot be started automatically. In that case, start it manually by following the instructions on this page.
Raspbian
Run start_rtc.sh included in the package downloaded from the Bulk Installation section.
cd RaspberryPiMouseRTSystem_script_Raspbian
sh start_rtc.sh
The following components will be started:
RaspberryPiMouseRTC0
RaspberryPiMouseController_DistanceSensor0
RaspberryPiMouseController_Joystick0
NineAxisSensor_RT_USB0
Restoring and Starting the RT System
On Windows, execute SimpleControlRasPiMouse_resurrect.bat located in the SimpleControlRasPiMouse folder of the downloaded script package.
This performs tasks such as:
- Connecting data ports
- Setting configuration parameters
Next, execute SimpleControlRasPiMouse_activate.bat to activate the RTCs.
SimpleControlRasPiMouse is an RT system that controls the Raspberry Pi Mouse through a GUI.
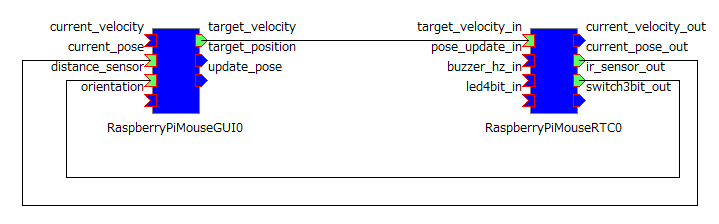
To deactivate the RTCs, run:
SimpleControlRasPiMouse_stop.bat
To disconnect the ports, run:
SimpleControlRasPiMouse_teardown.bat
Details of Each Sample
In addition to SimpleControlRasPiMouse, the following scripts are available for each sample:
| File Name | Description |
|---|---|
| ****_resurrect.bat | Restore RT system |
| ****_activate.bat | Activate RTCs |
| ****_stop.bat | Deactivate RTCs |
| ****_teardown.bat | Disconnect ports |
LightSensorControlRasPiMouse
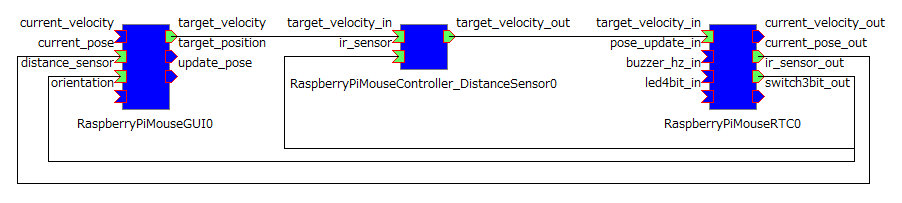
This sample provides GUI-based control of the Raspberry Pi Mouse and performs obstacle avoidance by rotating when the distance sensors detect an object.
Try changing the value of the sensor_limit configuration parameter of RaspberryPiMouseController_DistanceSensor0 to observe different behavior.
JoystickControlRasPiMouse
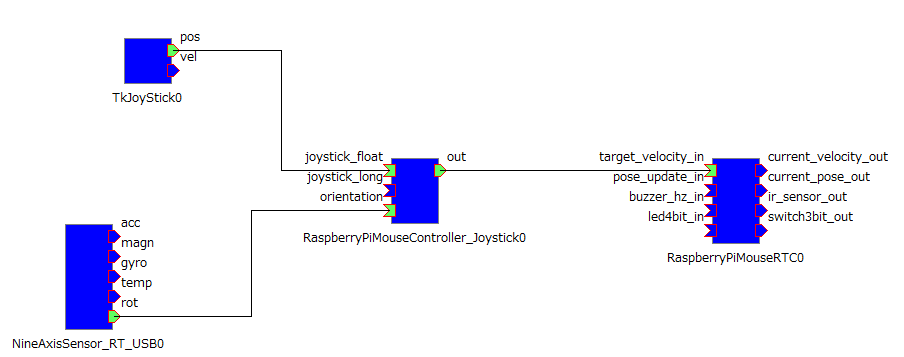
This sample uses the TkJoyStick sample component from OpenRTM-aist-Python to control the Raspberry Pi Mouse in the direction indicated by the joystick.
To use this sample, a USB-output 9-axis IMU sensor module must be connected to the Raspberry Pi.
Perform the sensor calibration while the sensor is mounted on the Raspberry Pi Mouse.
JoystickLightSensorControlRasPiMouse
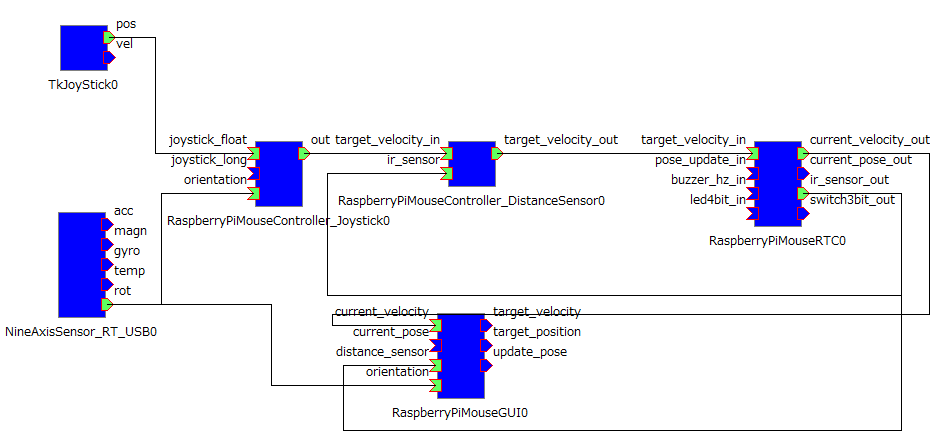
This sample allows control of the travel direction using TkJoyStick and additionally performs obstacle avoidance when the distance sensors detect an object.
GamePadSimpleControlRasPiMouse
This sample controls the Raspberry Pi Mouse in the direction indicated by the analog stick of a gamepad.
Connect the gamepad to the Windows PC before starting the system.
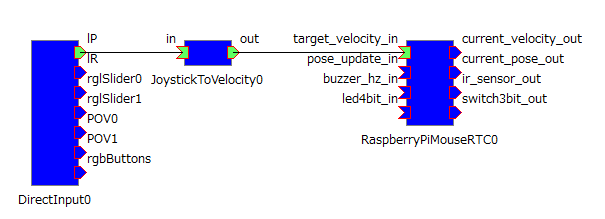
GamePadLightSensorSimpleControlRasPiMouse
This sample provides gamepad-based direction control and obstacle avoidance when the distance sensors detect an object.
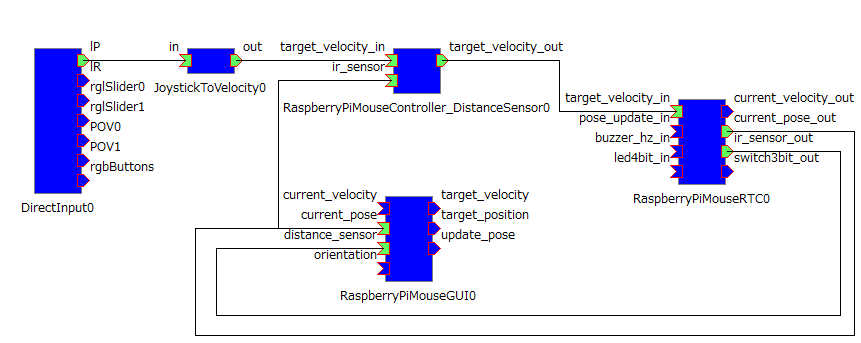
GamePadControlRasPiMouse
This sample controls the Raspberry Pi Mouse in the direction indicated by the gamepad’s analog stick.
A 9-axis sensor is used to estimate the current orientation, and the robot is controlled so that it moves in the direction specified by the analog stick.
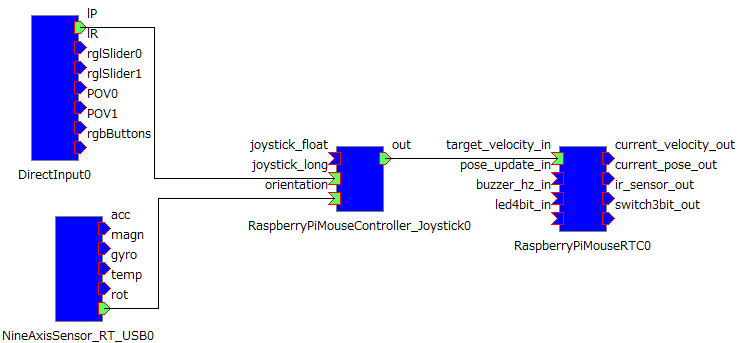
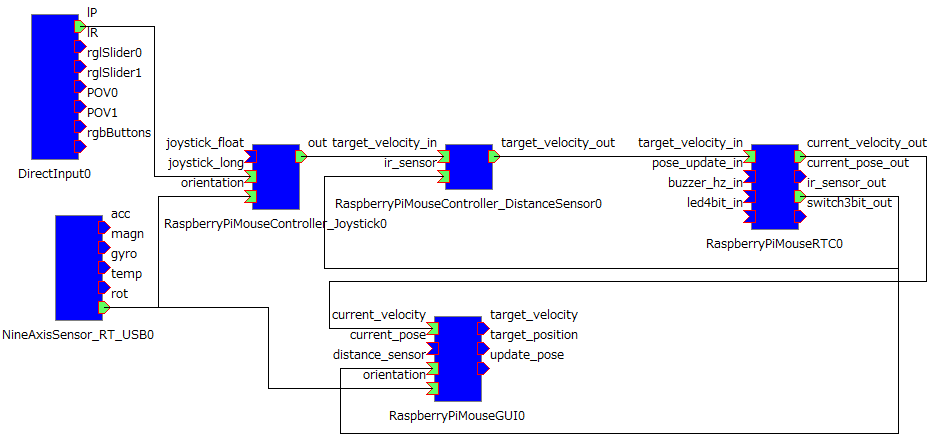
GamePadLightSensorControlRasPiMouse
This sample provides gamepad-based direction control and performs obstacle avoidance when the distance sensors detect an object.
Summary
In this tutorial, you learned:
- How to install the RTCs required for the sample RT systems.
- How to start the Name Server, RT System Editor, and RTCs on both Windows and Raspbian.
- How to restore, activate, deactivate, and tear down RT systems using provided batch files.
- The purpose and behavior of each sample RT system.
- How to control the Raspberry Pi Mouse using a GUI, joystick, or gamepad.
- How obstacle avoidance is implemented using distance sensor data.
- How a 9-axis IMU sensor can be used for orientation-aware control.
By completing this tutorial, you have learned how to launch, operate, and evaluate various sample RT systems for the Raspberry Pi Mouse platform.